What Are Dried Flower Wreaths And Why Are They So Popular
The History And Tradition Behind The Flower Wreath
Wreaths have served as powerful symbols for thousands of years. Early Greek and Roman civilizations used them to signify status and achievement. These circular arrangements represented eternal life and the cycle of nature. Builders used local vines or branches to create the base. These early designs focused on survival and resilience. Ancient cultures valued the wreath as a mark of military or athletic victory.
European folk traditions later integrated dried plants into household decoration. People preserved seasonal harvests to ensure color stayed inside during winter months. This practice was a tactical necessity before modern floral logistics. It allowed families to maintain a connection to nature year round. The Victorian era refined these techniques for aesthetic display. These historical roots prove that dried arrangements are stable and time tested design choices.
Why Dried Wreaths Last Longer Than Fresh Floral Arrangements
Fresh flowers rely on constant cellular hydration to maintain their shape. Once you cut a stem its biological clock accelerates toward decay. Bacteria in water and natural ethylene gas cause petals to wilt within days. Dried flower wreaths bypass this biological breakdown. Specialists remove the moisture from the plant tissue early. This process stops the rotting cycle and fixes the structural integrity.
Dried wreaths provide a superior return on investment compared to fresh options. Low humidity environments stop the growth of mold and fungus. You do not need to provide water or specialized light. These materials maintain their form and color for months or even years. Proper air drying or silica gel treatments lock the plant fibers in place. This makes them a durable asset for long term home staging and decor.

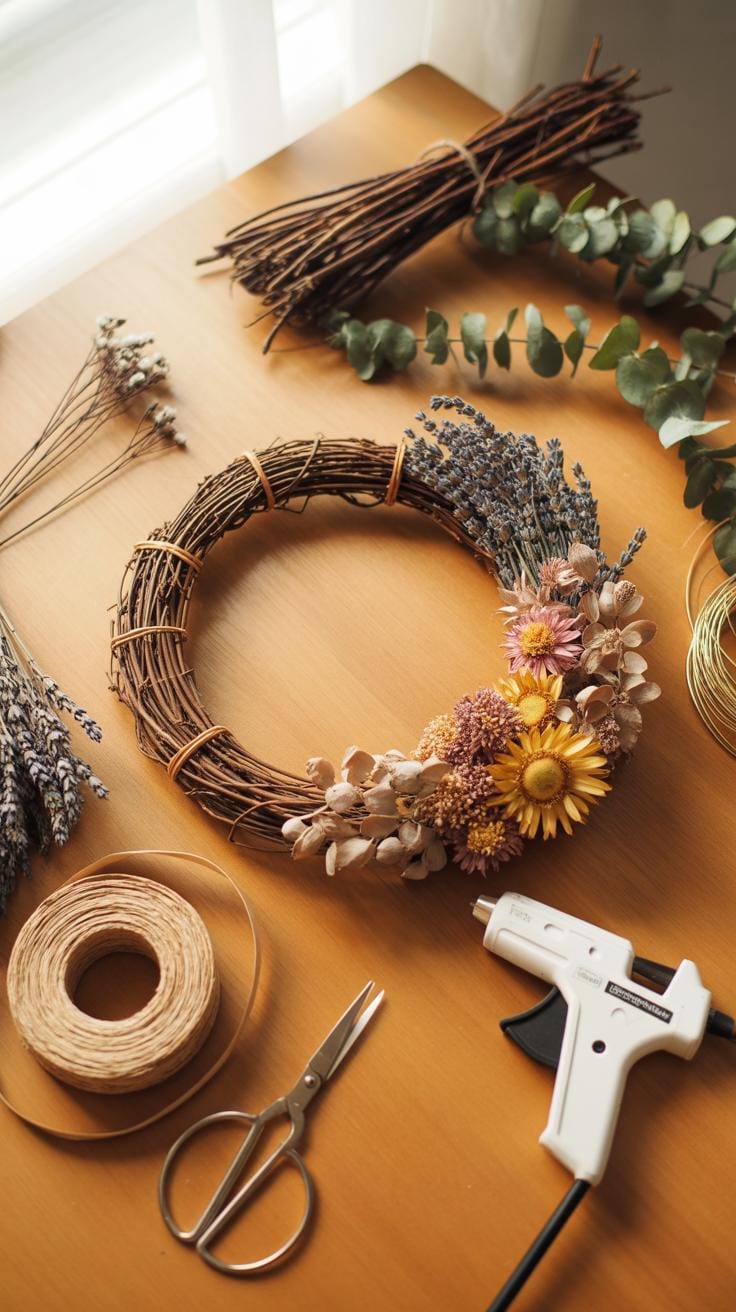
Essential Materials You Need To Make A Dry Wreath From Scratch
Choosing The Right Base For Your Dried Wreath
The foundation of your wreath determines the structural integrity and aesthetic direction of the final piece. Grapevine bases offer a rustic look and provide natural gaps for inserting stems. These wood bases handle heavy dried materials well and require less wire. Metal hoop frames create a modern minimalist style often seen in contemporary Scandinavian design. They require more precision during the binding process to hide the mechanics.
Straw forms provide a dense core for heavy floral loads but require pins rather than wire. These bases were standard in early Victorian floral arrangements for creating thick circular shapes. Choose your base based on the weight of your dried botanicals. Lightweight grasses suit thin metal hoops. Dense seed pods and woody stems need the grip of grapevine or straw. Select a diameter that fits your intended hanging space.
Must Have Tools And Supplies For First Time Wreath Makers
Gathering the correct mechanical tools prevents structural failure and speeds up your assembly process. You need tools that can handle both delicate dried petals and tough woody stems without crushing them. Quality wire and sharp cutters are non-negotiable for a professional finish. These supplies ensure your wreath stays intact during temperature changes and humidity shifts. Proper mechanics distinguish beginner attempts from high-quality artisanal products.
- Floral Wire: Use 22-gauge or 24-gauge paddle wire for securing large bundles to your frame. The paddle allows you to maintain constant tension while wrapping without the wire tangling. This ensures your botanicals do not slip out as they dry and shrink over time.
- Pruning Shears: Professional floral snips or bypass pruners provide clean cuts through thick stems and branches. Clean cuts prevent the shattering of fragile dried material. Sharp blades reduce hand fatigue during long assembly sessions and ensure every stem sits flush against the wreath base.
- Wire Cutters: Do not use your floral snips to cut metal wire because it dulls the blades. Hardened steel wire cutters snip through paddle wire and reinforced stems cleanly. This tool protects your expensive floral scissors and allows you to trim excess wire tails safely.
- Greening Pins: These U-shaped metal pins secure moss or heavy dried focal points directly into straw or foam bases. They provide a secure anchor without the need for excessive wrapping. Use them to layer textures or hide structural gaps in the design.
- Floral Tape: This wax-coated paper tape becomes sticky when stretched and helps bundle small stems together. It provides a grippy surface for wire to grab onto. Use it to create small floral picks from loose debris or broken flower heads.

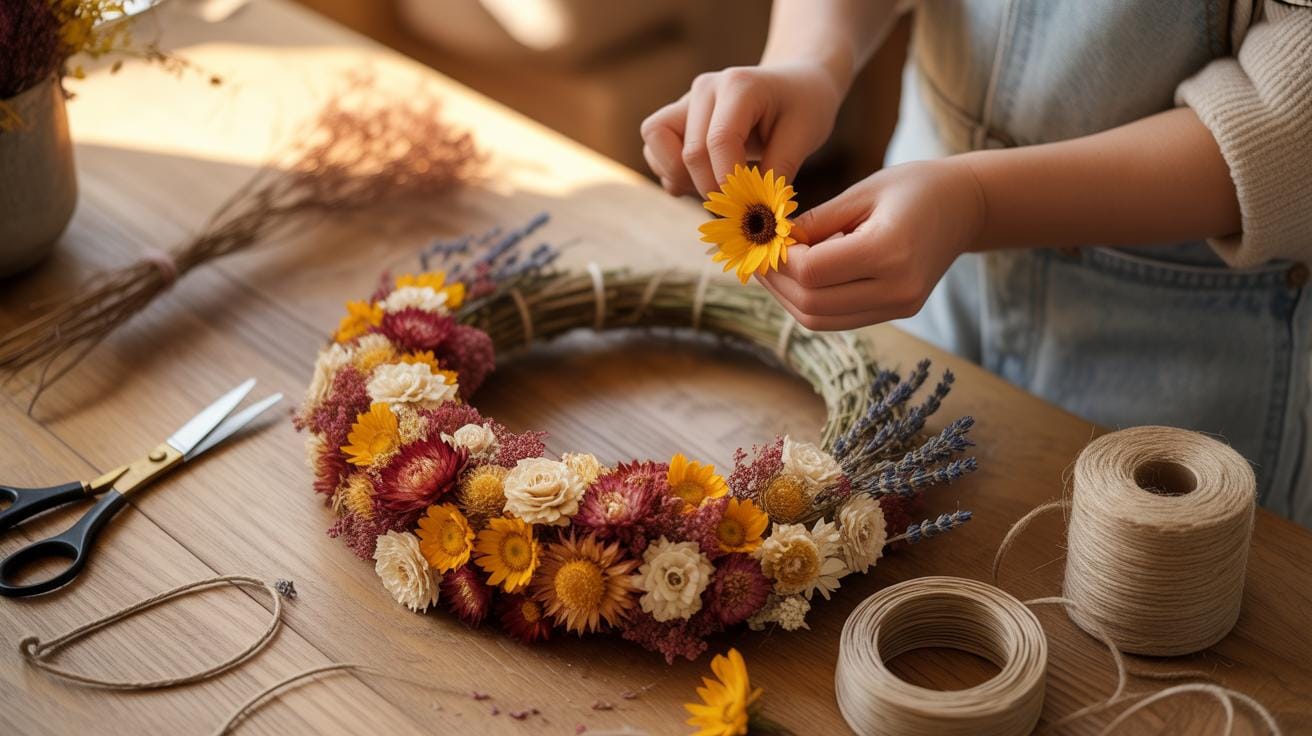
Select a dedicated workspace with a flat surface to maintain symmetry during the build. Use a hot glue gun for attaching small, delicate elements that wire might damage. High-temperature glue creates a permanent bond between the flower and the base. Always test the strength of your attachments by gently shaking the frame. Solid mechanics ensure your dried flower wreath lasts for several years.
Best Flowers And Botanicals For A Floral Wreath With Dried Flowers
Top Flower Varieties That Dry Beautifully And Hold Their Color
Choose flowers with low moisture content and stable pigments. Strawflowers are the industry standard because their petals are naturally papery. They retain intense colors for years. Statice and Gomphrena also provide reliable structural integrity. These varieties do not wilt during the drying process. They keep their shape and hue. You must select species that offer rigid stems and dense petal counts for maximum durability.
Yarrow and Lavender offer excellent scent and texture. These plants belong to traditional herbal design movements. They survive the dehydration process without shedding. Avoid lilies or tulips because they contain too much water and turn brown. Stick to Limonium or Craspedia for bold structural elements. These choices ensure your wreath looks professional and stays intact. High-quality botanicals reduce the need for chemical fixatives or artificial dyes.
How To Properly Dry Flowers At Home Before Crafting

Air drying remains the most effective method for wreath materials. Harvest your flowers just before they reach full bloom. Secure the stems with a rubber band to account for shrinkage. Hang the bundles upside down in a dark and dry room. Air circulation is vital to prevent mold growth. Darkness preserves the natural pigments and prevents UV fading. The process takes two weeks.
Desiccants like silica gel offer a faster alternative for delicate blooms. Place the flower heads in an airtight container filled with the crystals. This technique maintains the three-dimensional shape of complex flowers like spray roses. For flat foliage, use the pressing method between heavy absorbent papers. Pressing works best for eucalyptus or ferns used as backing. Always ensure the material is completely brittle before assembly to prevent rot.
Step By Step Guide To Making Your First Dried Flower Wreath
How To Plan Your Layout And Arrange Blooms Before Attaching
Dry layout prevents structural errors and material waste. Place your wreath base flat on a clean table. Use the clock face method to establish focal points at twelve, four, and eight o’clock. This technique stems from classic European floral design to ensure visual balance. Position your largest dried elements first to set the scale. Do not apply glue or wire during this stage.

Group your botanicals by height and texture. Place taller fillers behind flat blooms to create depth. Maintain a consistent flow direction, usually clockwise, to mimic natural growth patterns. Check for gaps by taking a photo of the arrangement from a bird’s eye view. This perspective reveals holes that your eyes miss up close. Refine the placement until the composition looks dense and intentional.
Securing And Finishing Your Dried Wreath For A Polished Look
Fasten stems using 22-gauge floral wire or high-temperature hot glue. Start from the inner rim and work outward. Wrap the wire tightly around the base and the stem. Overlap each new layer of flowers to hide the mechanics of the previous layer. This layering technique creates a seamless professional finish. Stop periodically to hang the wreath against a wall to check for loose components.
Apply a light coat of floral sealant or unscented hairspray once the assembly is complete. This step reduces shatter and protects the color from moisture. Inspect the back of the wreath for sharp wire ends. Fold these ends into the frame to protect your wall from scratches. Add a sturdy wire loop to the top for hanging. Firm attachment ensures the dried wreath survives gravity and movement.
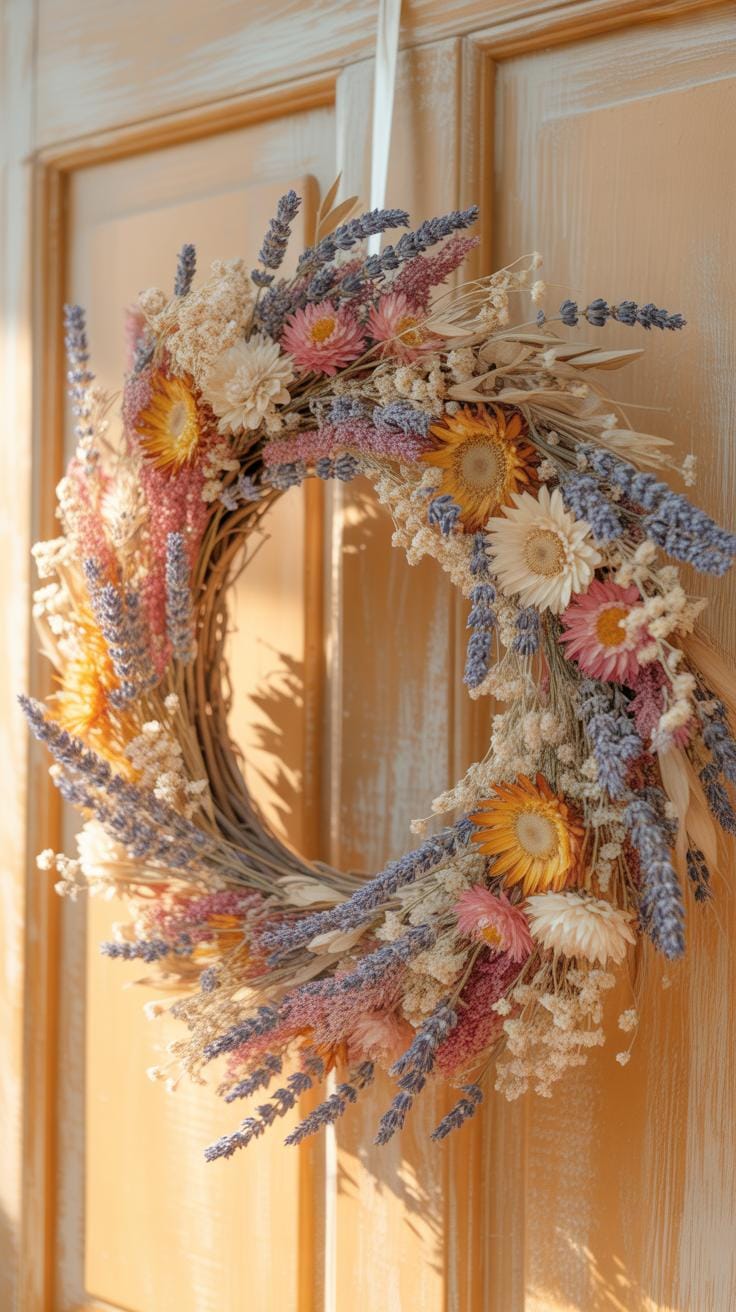
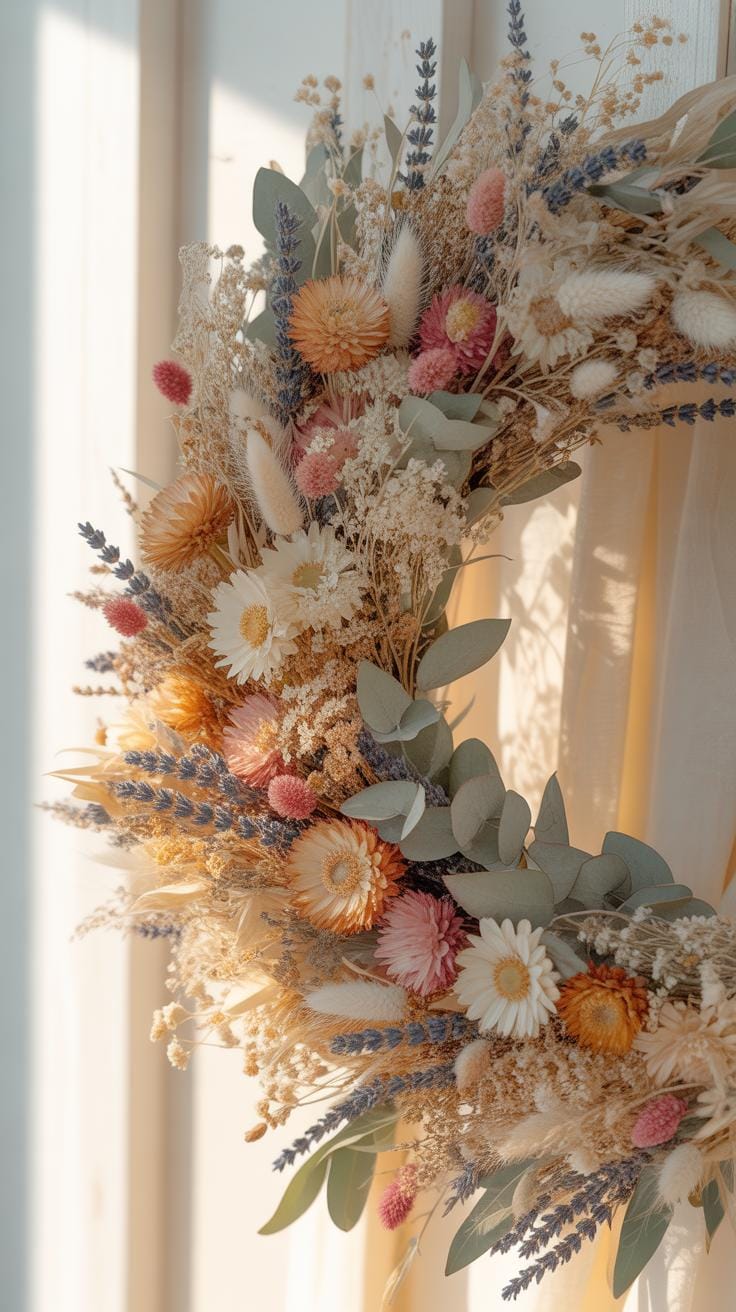
Creative Dried Wreath Ideas To Inspire Your Next Project
Seasonal Dried Wreath Ideas For Spring Autumn And Winter

Spring designs focus on airiness and light colors. Use air-dried larkspur and nigella pods to reflect the transition from winter. These materials retain their structural integrity well when harvested just before full bloom. Keep the base visible to emphasize a minimalist aesthetic. This style aligns with modern Scandi design principles where negative space matters as much as the floral components themselves.
Autumn and winter require denser textures and heavier materials. Use dried hydrangea macrophylla for bulk and deep amber tones. Incorporate preserved eucalyptus and ilex berries for winter durability. These woody stems provide the necessary support for heavier ornaments. Historic Victorian styles often used dried everlastings during these months to maintain indoor color. Focus on structural longevity to ensure the wreath survives temperature shifts in hallways.
How To Create Unique Wreaths Using Unexpected Natural Elements
Move beyond standard petals to increase visual interest. Integrate dried seed pods like lotus or poppy for geometric contrast. Use dehydrated citrus slices to introduce translucent textures that catch the light. Allium heads provide a spherical architecture that breaks up traditional flat arrangements. Incorporating these rigid elements prevents the wreath from looking dated and adds a sculptural quality found in contemporary high-end floral installations.
Incorporate dried grasses such as pampas or miscanthus for movement and feathered edges. These materials soften the rigid lines of the grapevine or wire frame. Forage for local lichen or moss to hide mechanics and add an ancient organic feel. This technique mirrors the Arts and Crafts movement’s focus on raw local materials. Ensure all wild-sourced items are fully desiccated to prevent mold growth within the finished wreath structure.
Dried Flower Wreath Ideas For Home DCor And Gifting


Where To Display Your Dried Wreath Inside And Outside The Home
Place dried wreaths in low traffic areas to avoid physical damage. Brittle stems break upon impact. Keep these arrangements away from direct sunlight to prevent color fading. UV rays bleach natural pigments quickly. Avoid bathrooms or kitchens where steam and high humidity occur. Moisture causes mold growth on organic matter. It also makes stalks go limp and lose their structural integrity.
Exterior placement requires a protected environment. Only hang dried wreaths behind a storm door or under a deep porch. Wind will strip delicate petals from the base. High humidity outdoors accelerates decay. Use a sturdy over door hook rather than nails to prevent shaking. Check the wreath weekly for signs of pest infestation or dampness. Bring the item inside during heavy rain.
Personalizing Dried Flower Wreaths As Thoughtful Handmade Gifts
Gifting dried wreaths requires a focus on the recipient’s specific environment and style. Match the floral selection to their home color palette for a cohesive look. Use high quality florist wire to secure every element. This ensures the gift survives transport and handling. Personalization adds value without increasing the cost of raw materials. Select stems that hold their shape over several months.
- Birthstone Colors: Integrate dried botanicals that mimic the hue of the recipient’s birthstone. Use yellow billy buttons for topaz or blue thistle for sapphire. This creates a logical connection to a specific celebration.
- Aromatic Herbs: Add dried lavender or eucalyptus to provide a natural scent. These plants retain their fragrance for a long time. They serve a dual purpose of visual beauty and home aromatherapy for the owner.
- Monogram Letters: Attach a wooden or wire letter to the center of the wreath. This identifies the gift as a custom piece for a specific family. Secure the letter with hidden brown wire to maintain a clean appearance.
- Seasonal Ribbons: Use velvet or linen ribbons to anchor the design to a specific holiday. Choose neutral tones for year round use or bright colors for festive events. Tie a secure bow that allows for easy hanging.
- Vintage Keepsakes: Loop an heirloom item or small locket into the grapevine base. This technique draws from Victorian traditions of sentimental floral displays. Ensure the object is lightweight so it does not pull the wreath out of balance.
Focus on the structural integrity of the gift during the packing process. Use a box that fits the diameter of the wreath tightly to prevent sliding. Fill gaps with acid free tissue paper to cushion delicate flower heads. Include a small card with care instructions. Tell the recipient to avoid water and sun. Clear communication ensures the handmade gift lasts for several years.
How To Care For And Preserve Your Dried Wreaths Over Time


Simple Maintenance Tips To Keep Your Dried Wreath Looking Fresh
Dust buildup is the primary enemy of dried floral arrangements. It dulls the natural colors and weighs down fragile petals. Use a hair dryer on the lowest, coolest setting to blow away debris. Keep the dryer at least twelve inches from the surface. This method prevents physical contact that often causes shattering. Clean the wreath every few weeks to maintain its structural integrity.
Structural integrity relies on stability and minimal handling. Move the wreath only when necessary for cleaning or seasonal storage. If pieces become loose, apply a small amount of clear floral adhesive to the stem base. Do not use heavy craft glue. It adds unnecessary weight. Avoid using water or liquid cleaners. Moisture restarts the decomposition process and causes mold. Keep the environment dry to ensure the stems remain brittle.
Earth laughs in flowers, and preserving their beauty in a simple wreath keeps the soul of summer in your home forever.
— Ralph Waldo Emerson
How Humidity And Sunlight Affect The Longevity Of Dried Wreaths
Direct sunlight triggers a process called photodegradation. This chemical reaction breaks down the natural pigments in the plant fibers. Excessive UV exposure causes vibrant colors to fade into a dull brown or gray. Place your wreath on interior walls away from windows. Avoid hanging dried flowers on front doors that face the sun. Artificial lighting is a safer alternative for preserving the original appearance.
High humidity levels soften the preserved plant tissues. Excessive moisture in the air causes the stems to limp and droop. It also provides the perfect environment for fungal growth. Avoid displaying dried wreaths in bathrooms or kitchens where steam is common. Use a dehumidifier in damp rooms to extend the life of the arrangement. Dry air maintains the rigid state required for the wreath to hold its shape.

Common Beginner Mistakes When Making Dried Flower Wreaths And How To Avoid Them
Why Overcrowding Blooms Can Ruin The Look Of Your Flower Wreath
Beginners often pack too many stems into one area. This creates a heavy and cluttered appearance. Dried materials need physical space to show their natural form. Excessive density hides the unique texture of individual flowers. You lose the visual contrast between the blooms and the base. Overcrowding also increases the total weight of the wreath. This weight puts unnecessary stress on the frame.
Focus on the negative space within your design. Leave gaps to allow the eye to rest. This technique mimics natural growth patterns seen in professional floral arrangements. Use a focal point and build outward with lighter filler. Stop adding material once you cover the mechanics of the base. Proper spacing ensures each stem remains secure. It also prevents delicate petals from crushing against each other.
Fixing Uneven Balance And Weak Attachment Points On Your Dried Wreath
An unbalanced wreath will tilt when you hang it on a wall. This happens when you distribute weight unevenly across the frame. Visual balance is just as important as physical weight. One side should not look much heavier than the other. Test the balance by hanging the wreath frequently during the assembly process. Adjust the placement of larger blooms to stabilize the center of gravity.
Weak attachment points cause materials to fall off over time. Do not rely on thin glue strings or loose wire loops. Wrap floral wire tightly around the main stems and the frame. Use professional grade hot glue for smaller accents. Ensure the adhesive touches both the stem and the base directly. Shake the wreath gently to find loose spots. Secure these weak areas immediately to ensure your work lasts.
Frequently Asked Questions

What are the best types of flowers for beginners to use in wreaths?
When starting out, the best flowers for dried flower wreaths are those with sturdy stems and petals that hold their color well. Focus on varieties like lavender, strawflower, statice, and baby’s breath. These “everlastings” are incredibly forgiving for beginners because they don’t crumble easily during the assembly process. Choosing these hardy blooms ensures your first project looks professional and vibrant, lasting for many months without dropping petals.
How do I securely attach the flowers to a wreath frame?
The most effective method for securing dried flower wreaths is using floral wire or a hot glue gun. For a rustic look on a grapevine base, tuck small bundles of stems into the natural gaps and wrap them tightly with thin green paddle wire. If you are using a metal hoop, floral tape or hot glue works best. Always work in one direction, overlapping each new layer to hide the stems and mechanics.
Can I make a high-quality dried wreath on a tight budget?
Absolutely! You can create stunning dried flower wreaths without spending much by foraging in your own backyard or drying grocery store bouquets. To save money, use affordable materials like cardboard or flexible willow branches for your base instead of buying expensive pre-made frames. Air-drying your own wildflowers or herbs is a cost-effective way to gather unique textures and scents while keeping your crafting expenses to a minimum.


