What Is Flower Resin Jewelry And Why Is It So Popular
Understanding The Art Of Resin Flower Jewelry
Flower resin jewelry combines botanical preservation with polymer chemistry. Makers suspend dried organic matter in liquid synthetic resins like epoxy or UV resin. This process creates a transparent protective seal around the plant. The technique stops the natural decay of the flower by removing oxygen exposure. This results in a durable piece of wearable art that maintains the floral form indefinitely.
The craft requires precise temperature control and specific mixing ratios. Artisans must dry flowers completely using silica gel or pressing methods before embedding them. Moisture reacts poorly with resin and causes rot or bubbling within the cast. The finished product functions as a modern iteration of historical herbarium specimens. High grade resins provide UV resistance to prevent yellowing or fading of the delicate plant pigments over time.
Why Crafters And Nature Lovers Are Falling In Love With Resin Jewellery
Demand for resin jewelry stems from the desire to preserve fleeting moments. Consumers value the ability to turn sentimental wedding bouquets or memorial flowers into permanent heirlooms. The medium offers a clear view of intricate biological details that traditional metalwork cannot replicate. It fills a niche for personalized accessories that focus on natural history. This trend aligns with the broader movement toward sustainable and botanical design styles.
Crafters favor resin because it allows for rapid prototyping and low entry costs. Recent advancements in UV resin technology mean pieces cure in minutes under specific light frequencies. This speed increases production efficiency for small businesses. Professionals also appreciate the versatility of the material. It bonds well with wood, metals, and dried insects. These technical advantages make it a top choice for creators seeking to push boundaries in jewelry design.
Essential Materials And Tools You Need To Get Started With Resin Jewelry Ideas
Core Supplies For Making Epoxy Resin Jewelry At Home
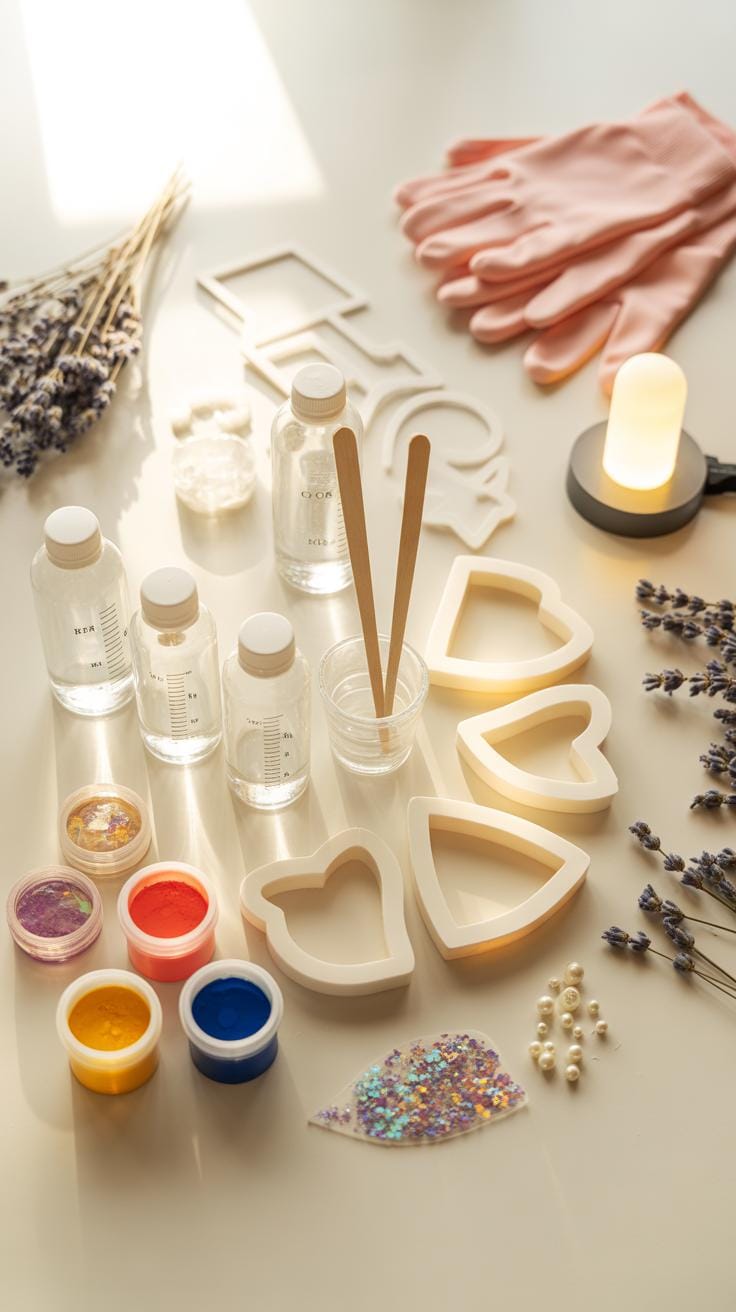
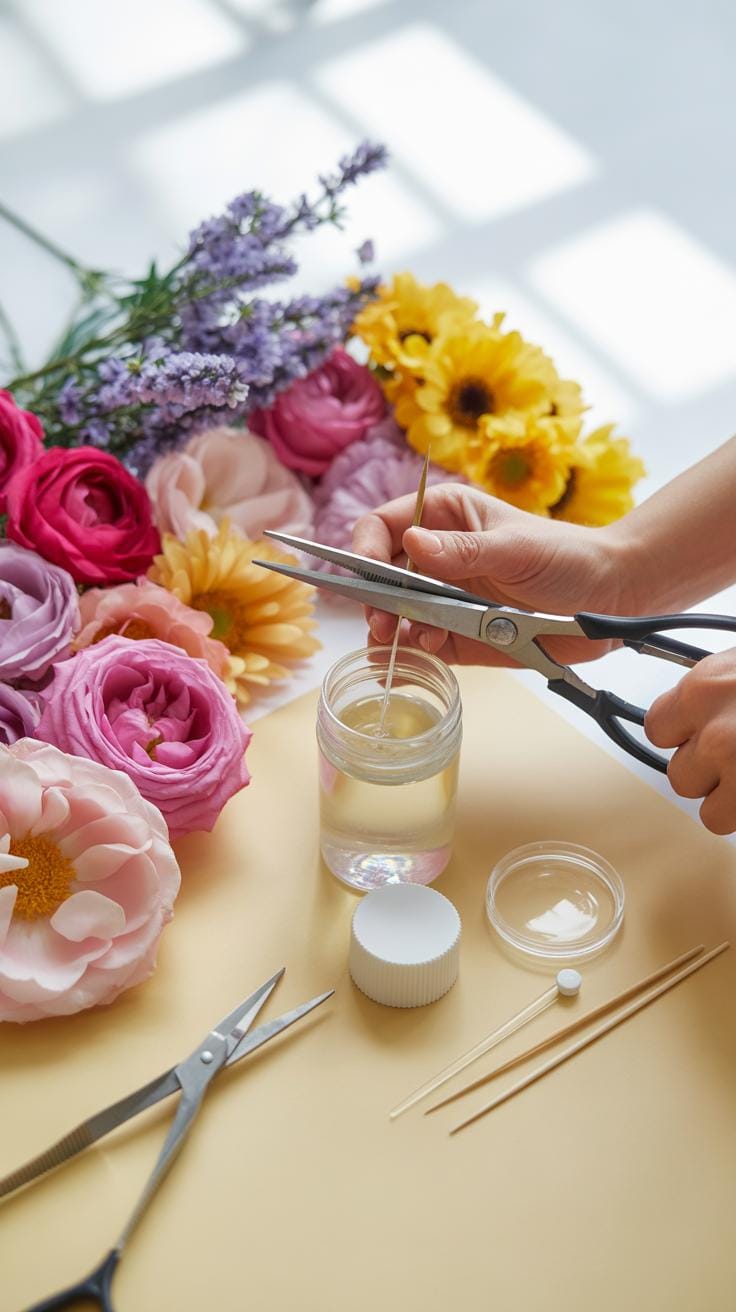
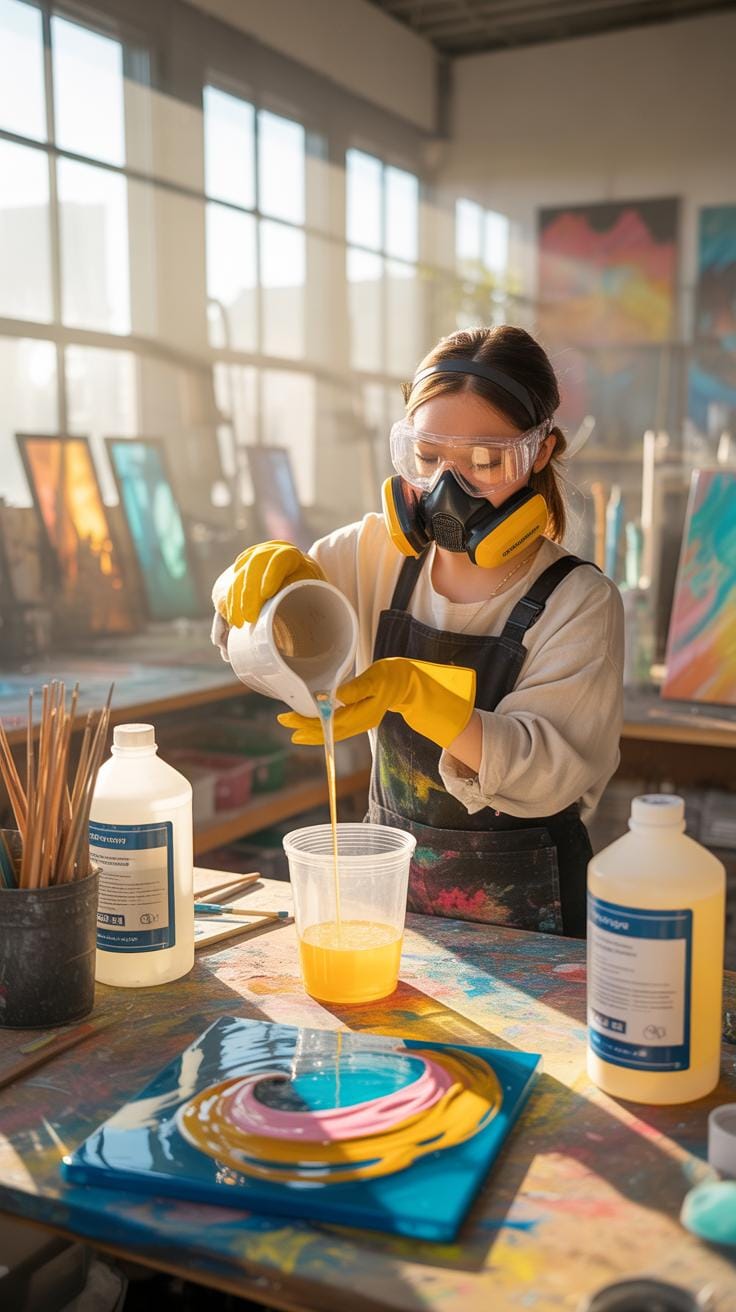
Success in resin casting requires high quality chemicals and safety gear. You must use a two part epoxy resin designed specifically for jewelry to ensure clarity and UV resistance. Cheap resins yellow quickly and ruin the aesthetics of preserved flowers. Always work in a ventilated space with a respirator mask. Nitrile gloves protect your skin from chemical burns and sticky spills during the curing process.
- Two Part Epoxy Resin: Select a low viscosity resin with a one to one mixing ratio for ease of use. This type allows air bubbles to escape more easily and provides a hard glass like finish that lasts for years.
- Silicone Mixing Cups: Use reusable silicone cups instead of plastic to reduce waste and cost. Once the resin cures you can peel it right out of the cup. This keeps your workspace clean and ready for the next batch.
- Digital Scale or Graduated Cups: Accuracy is the most important factor in the curing process. Use a digital scale for weight based resins or graduated cups for volume based versions. Even a small measurement error will prevent the resin from hardening.
- Heat Gun or Butane Torch: Bubbles are the primary enemy of clear resin jewelry. Pass a heat gun or torch quickly over the surface to pop micro bubbles. This step is necessary to achieve a professional look in every piece you create.
- Nitrile Gloves and Respirator: Safety is a non negotiable requirement for this craft. Epoxy resin releases fumes that can irritate the lungs and skin over time. Always wear protective gear to prevent long term health issues and chemical sensitivities.
Surface preparation defines the final quality of your work. Gather leveled drying boards to ensure the resin cures evenly without slanted edges. Use toothpicks or fine tweezers to position delicate flower petals without tearing them. Keep a dust cover over your curing pieces to prevent airborne particles from landing on the wet surface. Proper organization of these tools prevents mistakes and saves money on wasted materials.
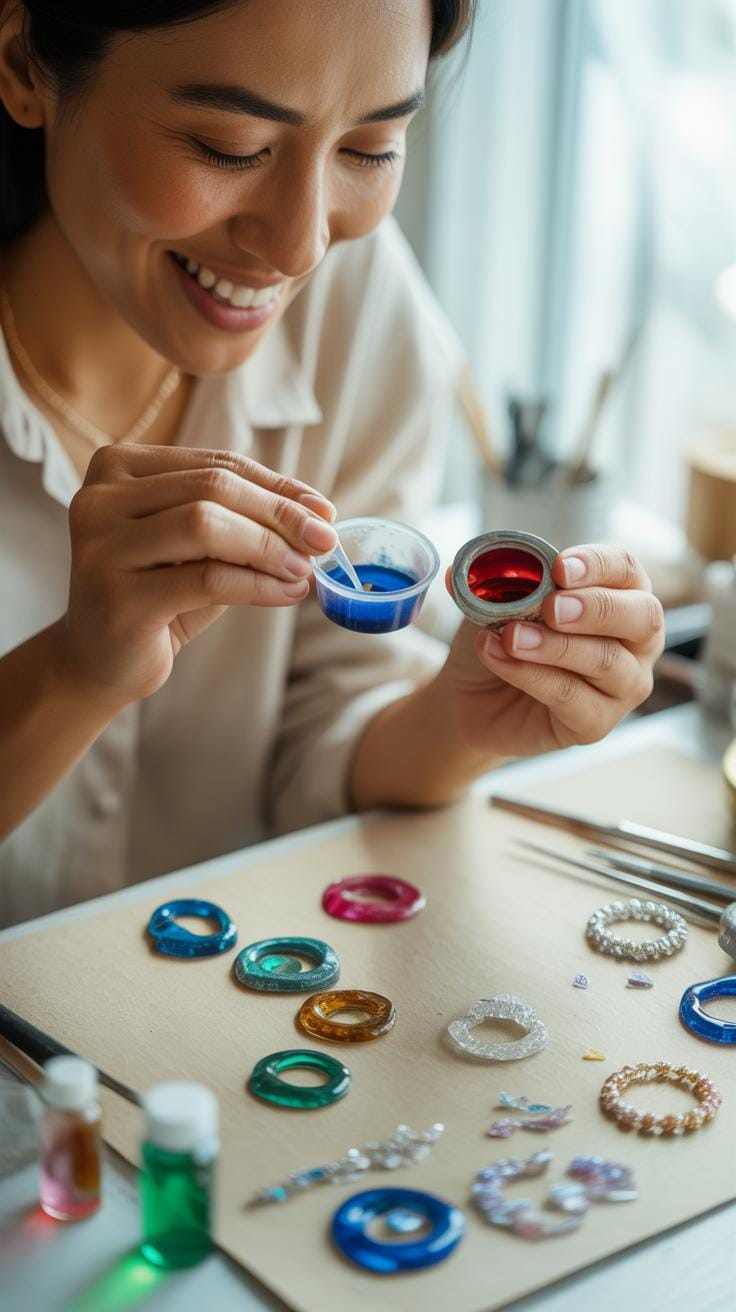
Choosing The Right Molds And Bezels For Your Flower Resin Jewelry Pieces
Silicone molds offer the most flexibility for complex shapes and 3D flower arrangements. Choose high grade polished silicone to achieve a shiny finish directly out of the mold. Matte molds will leave a dull surface that requires extra sanding and polishing work later. Clear silicone helps you see flower placement from all angles before the resin sets. This visibility allows for precise adjustments.
Metal bezels provide a structural frame for your art and simplify the finishing process. Open back bezels require specialized resin tape to create a temporary bottom seal during pouring. Closed back bezels create a solid background that can enhance the colors of your dried flowers. Ensure the metal is plated properly to prevent tarnishing over time. Sturdy frames protect the resin from chipping and add perceived value to every piece.

How To Select And Prepare Real Resin Flowers For Embedding
Best Flower Varieties That Work Well In Resin
Success in flower resin jewelry depends on structural integrity and pigment stability. Small, flat blooms like Queen Anne’s Lace or Lobelia perform best because they displace minimal resin. Thick flowers like full roses often trap air bubbles and rot if not processed. Choose flowers with thin petals that maintain color after drying. Avoid white flowers as they often turn translucent or yellow once the resin hits the organic fibers.
Woody stems and hardy petals survive the chemical heat of the curing process. Scabiosa and Hydrangea petals offer vibrant colors that resist fading under UV exposure. Always select specimens at their peak bloom for the best visual result. Organic material with high moisture content will fail during the curing stage. Stick to smaller botanical elements to ensure the jewelry remains lightweight and wearable. Focus on species known for structural rigidity.
Drying And Pressing Flowers Properly Before Using Them In Resin Crafts
Moisture ruins resin. You must remove all water from the plant before embedding it. Use silica gel sand to preserve the original three-dimensional shape of the flower. This method pulls moisture out quickly while keeping the petals from shrinking or wrinkling. Place the flowers in an airtight container with the gel for three to seven days. Test for a brittle texture before removing the botanical from the desiccant.
Pressing is the standard for flat jewelry designs like pendants. Place flowers between pH-neutral blotting paper to prevent browning or acid damage. Use a heavy press to apply even pressure for two weeks. This creates a thin profile that fits easily into shallow molds or bezels. Speed up the process with a dedicated microwave flower press if necessary. Ensure the flowers are completely dry to prevent mold growth inside the finished resin piece.
A Step By Step Resin Crafts Tutorial For Beginners
Mixing And Pouring Epoxy Resin Safely And Correctly
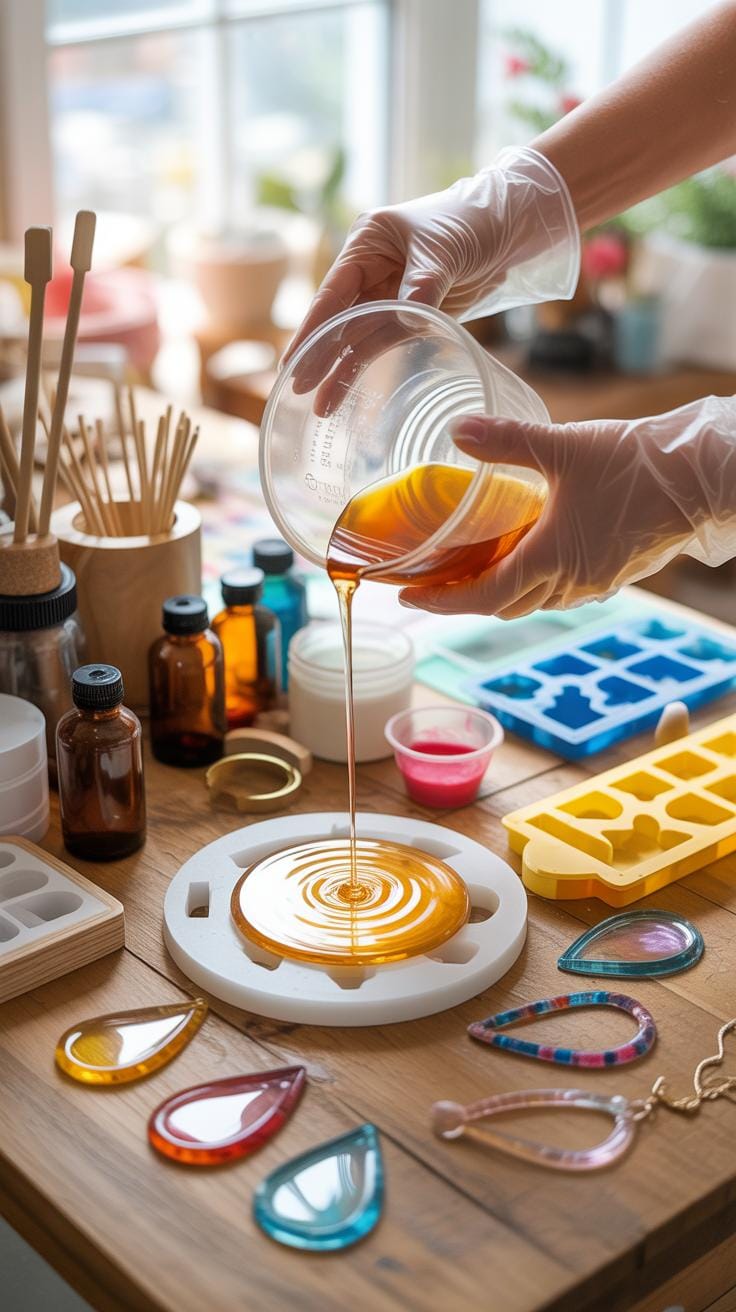
Achieving a crystal clear finish requires precise chemical ratios. Most jewelry grade epoxy resins use a one-to-one volume ratio. Measure the resin and hardener in separate graduated cups before combining them. Inaccurate measurements prevent the resin from curing. This leads to sticky surfaces that ruin your flower resin jewelry. Work in a well-ventilated space and wear nitrile gloves to protect your skin.
Stir the mixture slowly for at least three minutes. Scrape the sides and bottom of the container constantly. Rapid stirring introduces air bubbles that cloud the final piece. Allow the mixture to sit for two minutes after stirring to let bubbles rise to the surface. Pour the resin slowly into the mold. Use a heat gun or torch to pop any remaining surface bubbles immediately after pouring.
Embedding Flowers Into Resin: Layering Techniques That Work
Successful embedding requires dried botanical specimens. Moisture in fresh flowers reacts with resin and causes browning or rot over time. Place a thin base layer of resin into the mold first. Let this layer gel for thirty to sixty minutes. This creates a tacky surface that holds the flower in place. Without this step, your botanical elements will float to the top or shift during the curing process.

Position the flower face down for pendants or face up for open bezels. Press the specimen gently into the gelled layer to remove trapped air. Pour a second layer of resin to cover the flower completely. Use a toothpick to adjust the petals and push out air pockets. This multi-layer approach ensures the flower stays centered and visible. Proper layering creates the depth seen in high-quality professional resin art.
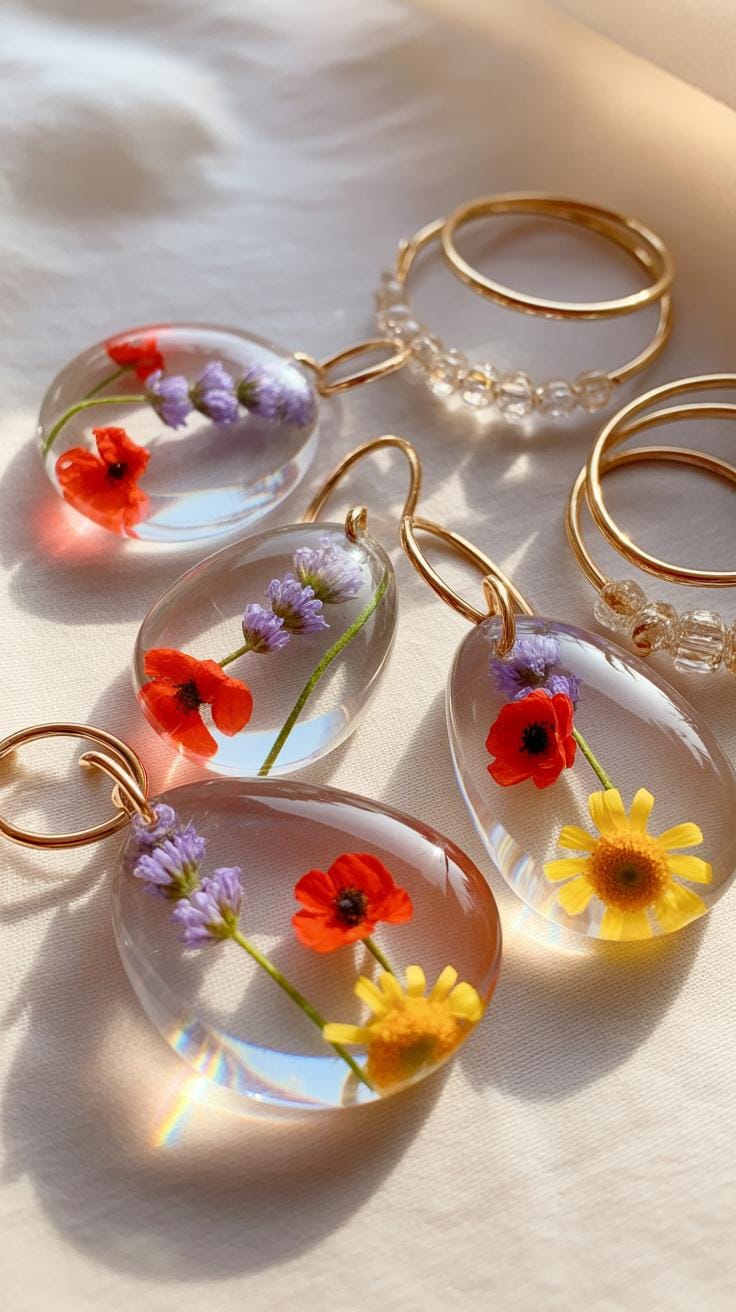
Creative Epoxy Resin Jewelry Ideas To Inspire Your Next Project
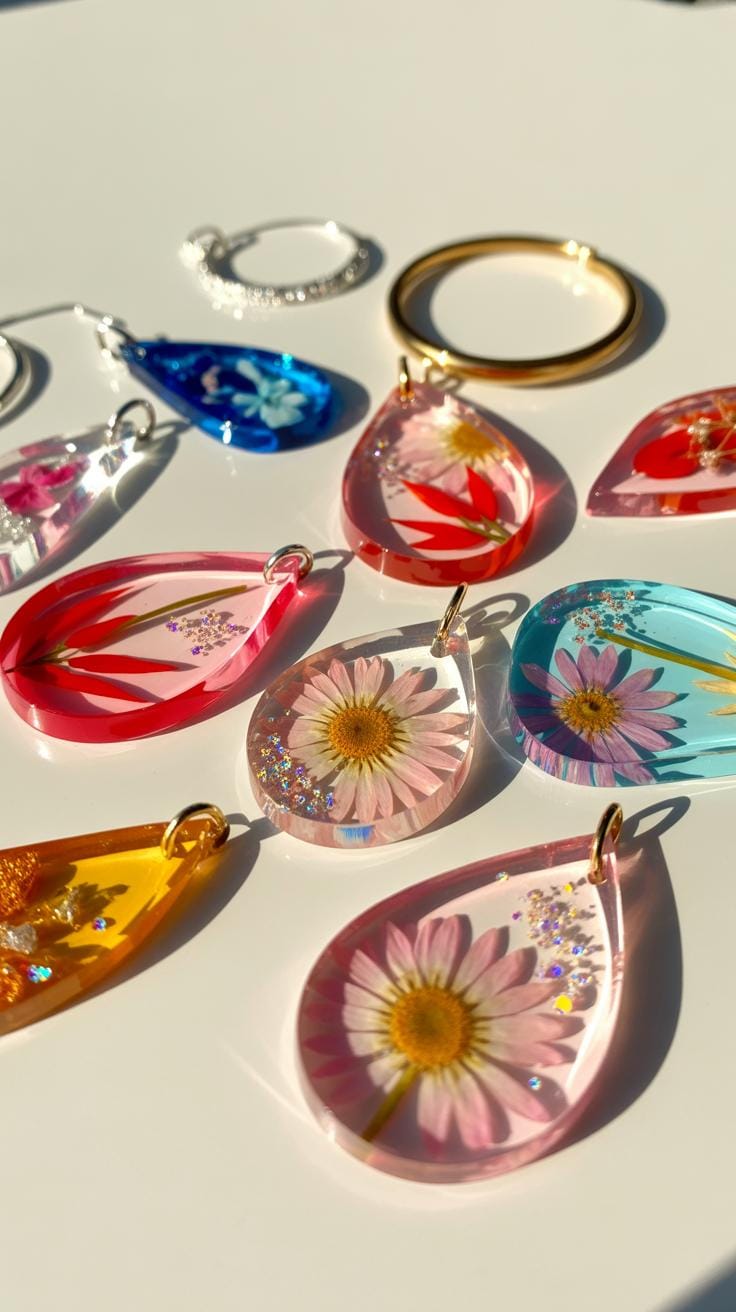
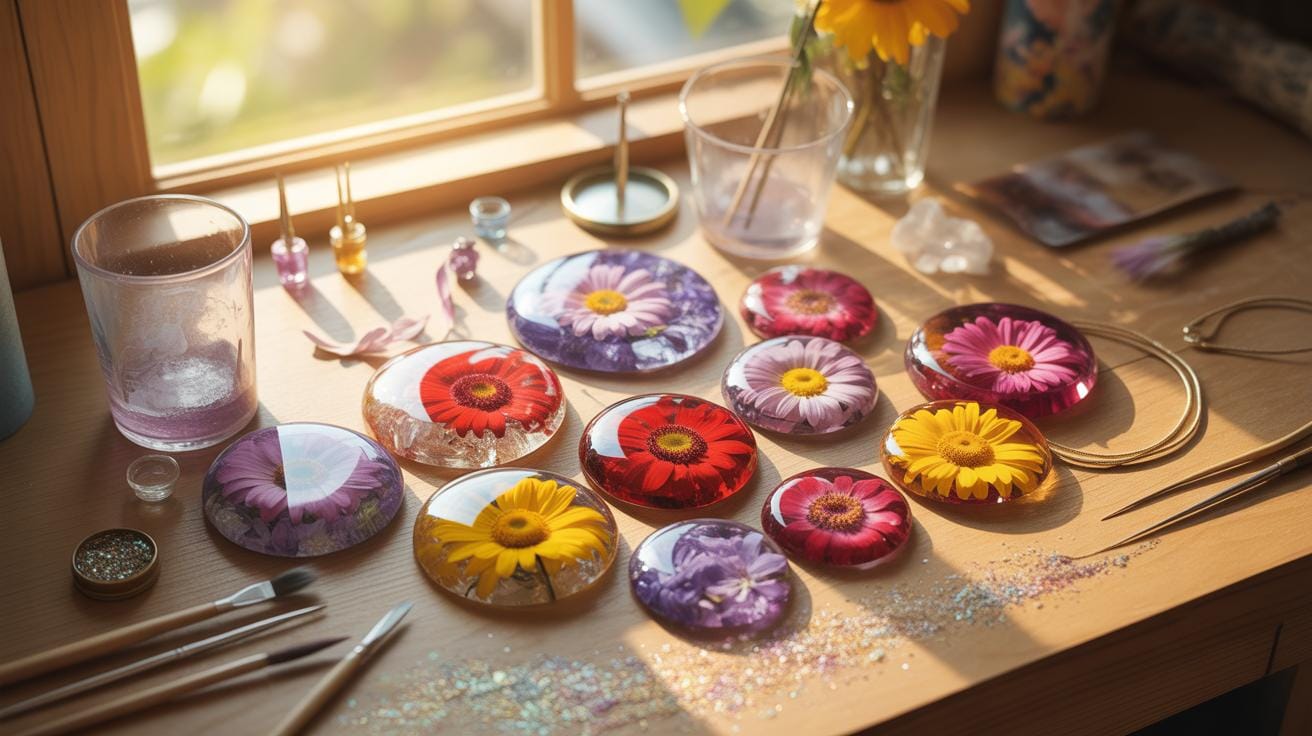
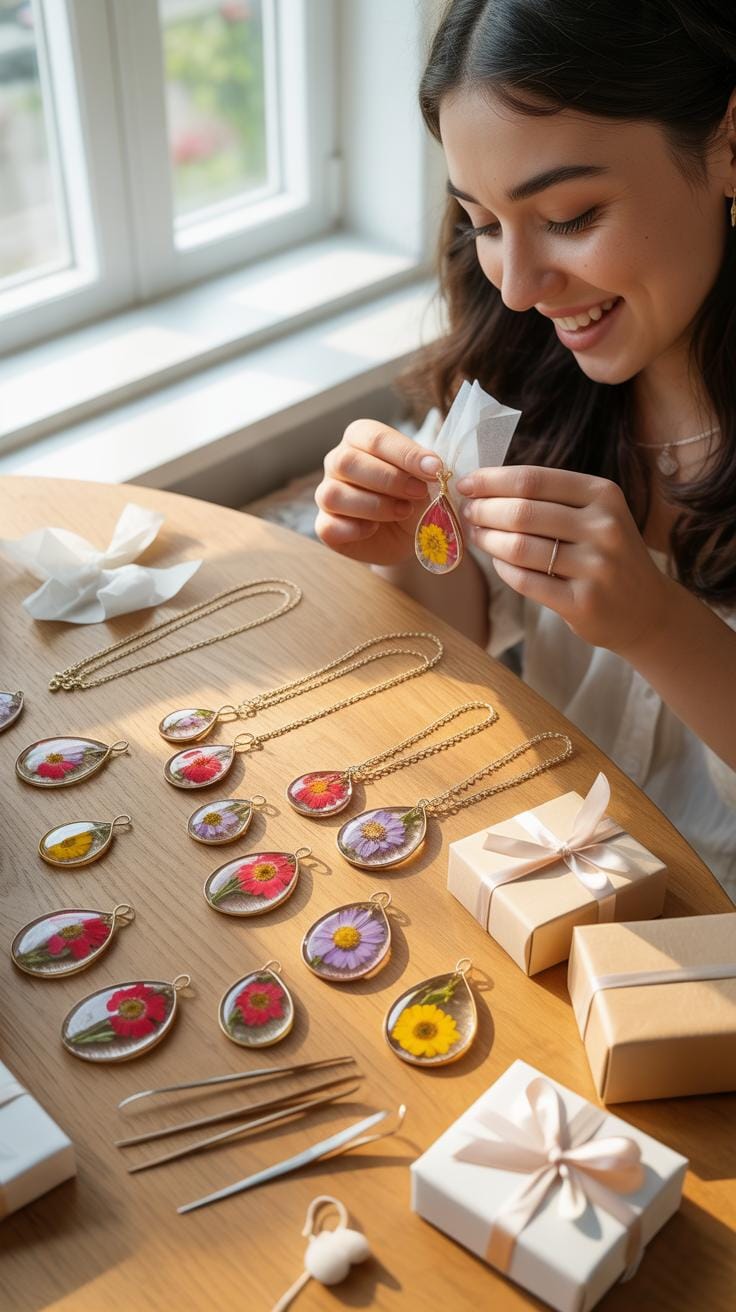
Popular Flower Resin Jewelry Styles: Pendants, Rings, And Earrings
Pendants remain the most common application for botanical resin work. Large bezels allow for complex arrangements of multiple flower species. You must dry all organic material completely before immersion to prevent rot or discoloration. Open back bezels require a sealing tape base to hold the liquid resin. Flat lay techniques work best for thicker specimens like rosebuds or small daisies.
Rings and earrings require different tactical approaches due to their size. Focus on micro-botanicals like Queen Anne’s Lace or heather bits for these pieces. Spherical molds often house single dried flower heads for a globelike effect. Dainty stud earrings rely on UV resin for fast curing and precise placement. Use high quality findings to ensure the final product withstands daily friction and skin contact.
Using Color, Glitter, And Foil To Elevate Your Epoxy Resin Art Designs

Strategic use of additives changes the depth of your botanical pieces. Translucent liquid dyes mimic the look of colored glass without obscuring the flower details. Add mica powder for a shimmer effect that catches light differently than glitter. Always mix these elements into a separate cup before pouring into the mold. This ensures even distribution and prevents clumps from ruining the visual clarity.
Metal leafing and foils add a professional finish to organic designs. Gold leaf provides a classic contrast against green stems and colorful petals. Place small flakes around the edges of the flower to draw the eye toward the center. Avoid overfilling the resin with glitter as it can sink and hide the botanical specimen. Balance is essential for maintaining the natural aesthetic of the flower.
How To Avoid The Most Common Mistakes In Epoxy Resin Jewelry Making
Why Bubbles, Cloudiness, And Sticky Surfaces Happen And How To Fix Them
Bubbles form due to aggressive stirring or cold temperatures. Cold resin traps air because it is thick. Cloudiness often results from moisture in the air or wet flowers. Resin reacts poorly to water. Sticky surfaces happen because of poor mixing ratios. If you do not measure accurately, the chemical bond fails. Always use a digital scale or graduated cups for precision.

Fix these issues with heat and timing. Use a torch to pop surface bubbles quickly. Keep your workspace dry to prevent cloudiness. Warm your resin bottles in a water bath before mixing to thin the liquid. If a piece stays tacky, you must sand it down. Apply a fresh, correctly mixed top coat to restore the finish. Never rush the curing process.
Pro Tips For Achieving A Crystal Clear Finish In Your Resin Jewellery
Achieving a professional finish requires strict control over your environment. Dust and oils destroy clarity instantly. Use a dedicated cover to protect curing pieces from airborne debris. Professionals prioritize high-quality UV-stabilized resins to prevent yellowing over time. Proper preparation stops micro-bubbles from forming around the delicate organic matter of the flowers. Follow these specific steps to ensure your jewelry stays transparent.
- Vacuum Degassing: Use a vacuum chamber to pull all air out of the mixed resin before pouring. This mechanical process removes trapped bubbles that manual stirring creates. It is the most effective method for high-volume production.
- Proper Flower Drying: Ensure all organic material is completely dehydrated using silica gel. Moisture inside the flower petals reacts with the resin. This reaction causes unsightly brown spots and internal fogging within the finished piece.
- Seal Organic Matter: Coat dry flowers in a dedicated sealant or thin resin layer before the main pour. This step prevents the air inside the plant tissue from escaping. It stops new bubbles from appearing during the curing stage.
- Maintain Room Temperature: Keep your workspace at a consistent seventy-five degrees Fahrenheit. Cold environments increase resin viscosity and trap air. Consistent heat ensures the resin flows into every small gap of the flower petals for total clarity.
- Gradual Layering Technique: Pour the resin in thin stages rather than one deep fill. This method allows heat to dissipate and air to escape easily. It prevents the flash curing that causes cracks and distortion in your jewelry.
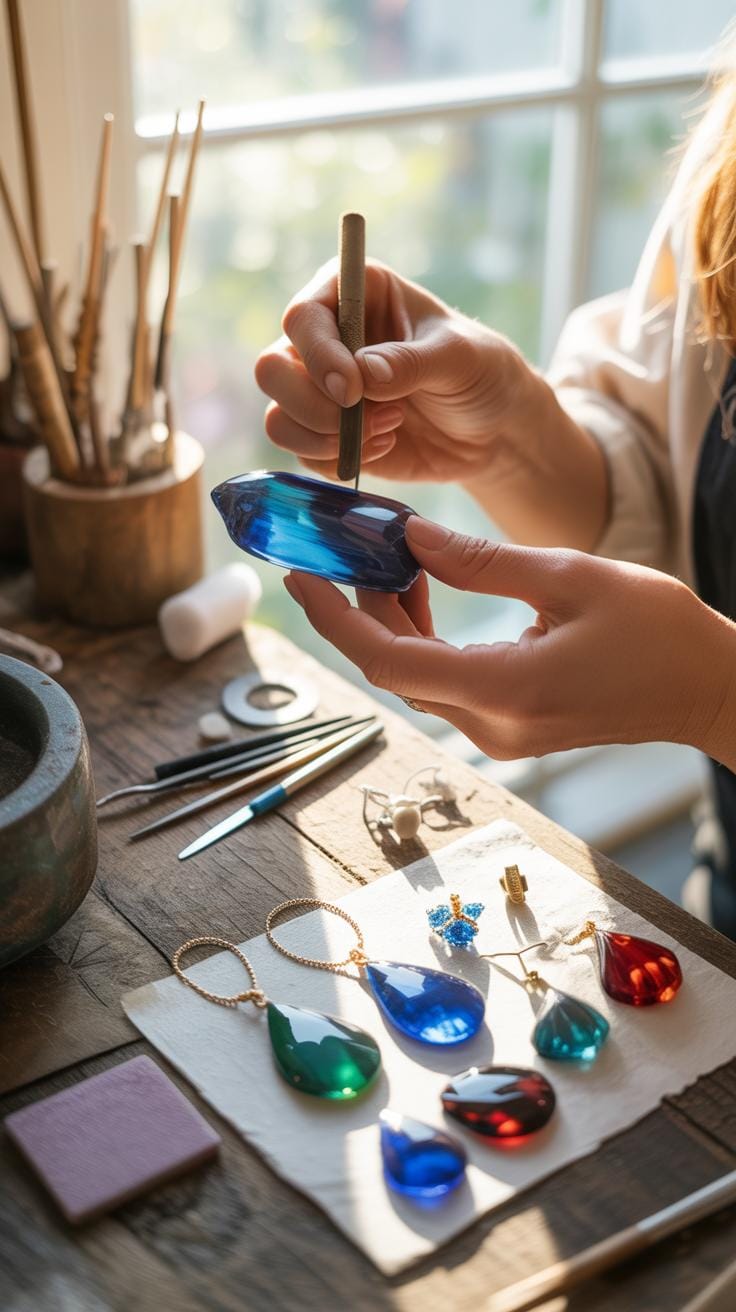
Sanding and polishing are the final steps for a glass-like look. Start with coarse wet sandpaper and move to ultra-fine grits. Finish with a high-quality polishing compound and a microfiber cloth. This removes any minor surface imperfections or mold marks. A clear finish proves your technical skill. Clean your tools with isopropyl alcohol to avoid cross-contamination in the next batch.
Safety Guidelines Every Maker Should Follow When Working With Epoxy Resin Art
Understanding Resin Fumes, Skin Irritation, And Proper Ventilation
Epoxy resin creates a chemical reaction called curing. This process releases volatile organic compounds into the air. Breathing these fumes can cause headaches or respiratory damage over time. You must work in a space with active airflow. Open windows and use fans to move air away from your face. Never assume a lack of odor means the air is safe to breathe.
Direct skin contact with liquid resin causes contact dermatitis. This is an allergic reaction that worsens with each exposure. Once you develop a resin allergy, you often cannot work with the material again. Wash skin immediately with soap and water if contact occurs. Do not use solvents like alcohol to clean skin. Solvents break down the resin and help it enter your bloodstream.
Safe Workspace Setup And Protective Gear For Resin Crafts
A safe workspace requires specific equipment to block chemical exposure. You must wear a respirator with organic vapor cartridges. Dust masks do not filter out chemical fumes. Wear nitrile gloves instead of latex. Latex reacts with resin and can tear easily. Use safety goggles to stop splashes from hitting your eyes. Proper gear is the only way to prevent long term health issues.
Cover your work surface with silicone mats or heavy plastic. This prevents resin from soaking into wood or fabric surfaces. Keep a dedicated trash can for resin waste and empty it daily. Store your chemicals in a cool and dark place away from food. Do not eat or drink while working with these materials. Clear organization prevents accidents and keeps your home environment free from toxic contamination.
Finishing Polishing And Assembling Your Resin Art Ideas Into Wearable Pieces

Sanding And Polishing Cured Resin To A Professional Shine
Cured resin often has sharp edges or a matte finish. Start with wet sanding to prevent heat buildup and dust. Use waterproof sandpaper starting at 400 grit. Move up through 1000, 2000, and 3000 grits. This process removes imperfections from the mold. It creates a smooth surface for the final shine. Consistency is vital for a high-quality finish on Flower Resin Jewelry.
After sanding, apply a polishing compound to restore clarity. Use a microfiber cloth or a rotary tool with a felt buffing wheel. Work in small circles to avoid burning the plastic. The friction generates a glass-like transparency. This step reveals the intricate details of the preserved botanical specimens inside. Wipe away excess compound to ensure a clean surface before you begin the final assembly.
To create is to anchor the fleeting beauty of a season into a treasure that lasts forever. Each bloom preserved in resin is a memory held in light, capturing the soul of nature with your own hands.
— Edith Holden
Attaching Jewelry Hardware: Clasps, Jump Rings, And Ear Hooks
Select hardware that matches the weight of your resin pieces. Standard kits include jump rings, lobster clasps, and fishhook ear wires. Use two pairs of needle-nose pliers to open jump rings. Twist the ends sideways rather than pulling them apart. This method maintains the circular shape and structural integrity. Proper technique prevents the metal from fatiguing and snapping during regular daily wear.
Align the hardware with the drilled holes in your resin. Slide the jump ring through the piece and attach the clasp or hook. Twist the ring back to a closed position until the ends touch perfectly. A gap will catch on hair or clothing. Strong connections ensure the jewelry remains secure for the wearer. Check every link for stability before packaging your finished floral resin products.
How To Store Care For And Sell Your Flower Resin Jewelry Creations
Proper Storage And Maintenance To Keep Resin Flower Jewelry Looking Its Best
Resin yellowing occurs when ultraviolet light breaks down polymer chains. You must store finished pieces in dark, cool locations away from direct sunlight. Use velvet-lined boxes or drawers to prevent scratches on the surface. Epoxy resin is a soft plastic that marks easily. Proper storage preserves the clarity of the material and the original color of the preserved botanical specimens inside.
Keep resin jewelry away from chemicals like perfume, hairspray, and acetone. These substances dissolve the surface finish and cause permanent clouding. Clean your pieces with a soft microfiber cloth and mild soapy water only. Avoid high heat environments which can soften the resin and cause warping. Proper maintenance ensures the jewelry remains a high-quality product for the end user and maintains its structural integrity.
Turning Your Passion Into Profit: Selling Resin Jewelry Ideas Online And Locally
Selling resin jewelry requires high-quality macro photography to show clear details. Use natural lighting to highlight the botanical elements and the transparency of the resin. Precise product descriptions must list the specific flower species and the type of metal findings used. Choose platforms like Etsy or Shopify for global reach. These sites allow you to target customers looking for handmade and botanical accessories.
Local markets provide immediate cash flow and direct customer feedback. Apply for craft fairs that vet vendors to ensure a high-quality shopping environment. Use professional packaging that protects the jewelry during transport. Branded backing cards and care instructions add professional value to every sale. Build a consistent brand identity across all channels to increase trust and repeat business from your growing customer base.
Frequently Asked Questions

What are the best types of flowers to use for resin jewelry?
When starting out with flower resin jewelry, it is essential to use completely dried or preserved blossoms. Fresh flowers contain moisture that will cause the resin to turn brown or rot over time. Small, flat varieties like pansies, laceflowers, and hydrangeas are perfect for beginners because they fit easily into jewelry bezels and retain their vibrant colors beautifully once submerged in the clear casting resin.
How do I prevent air bubbles from forming around the petals?
Preventing bubbles is a common challenge when crafting flower resin jewelry. To achieve a crystal-clear finish, try dipping your dried flowers into a small amount of liquid resin before placing them in the mold. This “pre-coating” technique helps displace trapped air. Additionally, use a heat gun or a fine toothpick to gently pop any bubbles that rise to the surface while the jewelry piece is still in its liquid state.
Do I need expensive professional equipment to start making jewelry?
You do not need a massive budget to begin your creative journey. Many high-quality starter kits provide the basic epoxy, mixing cups, and molds at an affordable price point. Instead of buying expensive dried kits, you can press wildflowers from your own backyard between heavy book pages. This makes creating beautiful flower resin jewelry an accessible and budget-friendly hobby for anyone looking to capture the fleeting beauty of nature.


