

The Square Foot Garden Trap: Why Generic Layouts Fail Your Raised Beds

Rigid Grids Ignore Your Actual Constraints
You want permission to follow a system that works for someone else so you don’t have to think. That’s the real motive. But square foot gardening treats all raised beds like they’re identical, and they’re not. The mechanism is borrowed from manufacturing: economies of scale assume standardization. Apply that logic to gardening and you ignore sunlight patterns, soil drainage, wind exposure, and your region’s actual growing season. A 4×8 grid layout works in California’s Sacramento Valley. It fails in Minnesota’s short season with clay soil.
The generic square foot guide prescribes fixed spacing without asking about your conditions. Tomatoes need more vertical airflow in humid climates but deeper root space in dry ones. Lettuce wants shade in July but full sun in April. A printed template can’t account for these variables. You follow it anyway because deviation feels like failure. The system gets blamed instead of the person who didn’t adjust it.
When Your Bed Isn’t Your Garden’s Bottleneck
Economics teaches resource allocation: identify your scarcest asset and optimize for it. In raised beds, that asset is rarely space. It’s usually water availability, sunlight hours, or soil depth. Most beginners assume they’re “limited by bed size” when they’re actually limited by something else entirely. A 4×4 bed with eight hours of direct sun grows more than a 4×8 bed with four hours and competing tree roots pulling moisture.
Treating layout as a spacing problem misses the real constraint. If your bottleneck is water, dense planting fails because plants compete for moisture during dry spells. If it’s light, cramming more plants into shade means nothing germinates properly. If it’s soil depth, shallow-rooted plants survive but tomatoes starve. Map your actual constraint first, then design the layout around it. The spacing grid comes last, not first.
Microclimates & Shadow Maps: Decoding Your Raised Bed Vegetable Garden

Track Where Shadows Land First
You want to believe your whole yard gets equal sun. It doesn’t. The mechanism here borrows from physics: shadows are cast objects, and their position changes predictably as the sun moves. Your job is to plot that movement across your raised bed before you plant anything. Most people skip this step and wonder why half their tomatoes stay green. Mark your bed’s perimeter in the morning, at noon, and in late afternoon. Note where shade falls. Document which direction is true north. Do this for one week to capture the seasonal angle.
The shadow map becomes your planting reference. Tall crops like pole beans or indeterminate tomatoes go on the north side of your bed so they don’t block sun from shorter plants on the south side. Leafy greens that bolt in heat go where afternoon shade naturally lands. If your yard has tree cover, the shadow moves throughout the season as leaves fill in or drop. This isn’t optimization theater. This is the difference between a crop that produces and one that struggles toward the fence looking for light it can’t find.
Find The Heat Traps And Cold Pockets
Different zones of a single raised bed warm at different rates. South-facing edges absorb more solar energy and stay hotter longer. North sides stay cooler because they get less direct radiation. Low spots in your yard collect cold air on frost nights. A bed positioned in a wind tunnel dries out faster and stresses plants unnecessarily. Walk your bed site at 6 AM in spring and again at 6 PM in summer. Feel the soil temperature with your hand. Stick a soil thermometer in different spots to quantify the variance.
Plant heat-loving crops like peppers and eggplant in the warmest zones. Reserve cool zones for lettuce, spinach, and brassicas. If your entire bed runs too cold, raise it higher or paint the sides dark to absorb more heat. If one corner stays waterlogged while another dries out, you have a drainage issue masked as a microclimate problem. Fix drainage before you plant. The real move is this: match the plant’s thermal needs to the exact spot where those conditions naturally exist in your bed layout.
The Root Zone Protocol: Maximizing Underground Real Estate In Your Garden Bed Layout

Shallow Roots Vs Deep Roots
You want to pack more plants into less space without them sabotaging each other. That’s the real game here. Root depth is the mechanic that makes this possible. Plants don’t compete for the same underground real estate if their roots operate at different levels. Lettuce roots stay in the top 6 inches. Tomatoes drill down 24 inches or more. Carrots hit 12 inches. Stack them vertically and you’ve just tripled your bed’s production capacity without changing the footprint.
The common advice stops at “plant shallow-rooted crops near deep-rooted crops” and calls it done. That’s incomplete. You need to know actual depths to make real decisions. Shallow-rooted plants include lettuce, spinach, radishes, and most herbs, all maxing out between 6 and 8 inches. Medium-depth roots—beets, bush beans, chard—hit 12 to 18 inches. Deep-rooted plants like tomatoes, peppers, carrots, and parsnips demand 20 inches or deeper. Know these numbers before you place anything.
Staggered Planting For Layered Production
Think of it like geological stratification: different soil layers support different organisms. Your raised bed has three usable zones for roots, and you exploit each one. The top 6 inches sustains leafy greens and herbs. The middle 8 to 18 inches holds medium crops and secondary root systems. The bottom 18-plus inches anchors deep feeders. Don’t clump deep-rooted plants together. Spread them out so shallow and medium plants can fill the gaps above and beside them.
The actual protocol: plant deep-rooted crops first, mapping their positions on your bed. Tomatoes and peppers at 3-foot centers or wider. Carrots and parsnips in rows with 6-inch spacing. Then backfill the gaps with medium-rooted crops at 12-inch intervals. Finally, use the top zone for succession plantings of greens and herbs that you’ll harvest before they expand downward. This stagger multiplies yield per square foot because every inch of depth pulls its weight instead of competing for the same 8 inches.
Nutrient Flow Design: Applying Hydrodynamics To Your Planting Layout

How Plants Actually Pull Nutrients From Soil
You want this section to validate that you’re doing something sophisticated with your garden. The truth is simpler: plants don’t hunt nutrients evenly. Roots follow water gradients, and nutrient uptake follows root density. Hydrodynamics teaches us that fluid moves along paths of least resistance. In soil, water carries dissolved nutrients to roots through capillary action and drainage. Your layout must mirror this flow or nutrients pool uselessly while roots starve nearby.
Plant roots concentrate where moisture persists longest. Sandy soil drains fast, leaving roots chasing water deeper. Clay holds moisture but blocks drainage, creating dead zones. Nutrient availability depends entirely on where water moves through your bed. Dense root systems in tomatoes and peppers need consistent moisture and calcium delivery. Lettuce and spinach thrive in shallower, wetter zones. Your planting arrangement should treat the bed as a hydrodynamic system where water delivery determines nutrient access, not just soil composition.
Water Distribution Drives Everything Else
Most gardeners obsess over soil amendments and forget that water distribution is the actual control lever. Hydrodynamics reveals the mechanism: water moves toward lower pressure and drains downslope. In a raised bed, you control this by managing bed slope, compaction, and plant placement. Tight soil compaction creates barriers that push water sideways rather than down. Loose soil accepts water but drains too fast unless amended with organic matter that holds moisture like a wick.
Position heavy feeders like tomatoes, peppers, and squash where drainage is slowest or where you can apply water most consistently. Place root crops like carrots and beets in zones with moderate drainage where they won’t split from excess moisture or shrivel from drought. Leafy greens tolerate wetter areas because they’re shallow-rooted and benefit from steady moisture. Shallow-rooted plants grouped together actually reduce competition because they create a shared moisture layer. The most overlooked principle: water placement strategy matters more than fertilizer type.
The Guild System: Beyond Companion Planting For Raised Beds

How Plants Actually Work Together
You want companion planting to feel like a hack that solves everything. It won’t. The real mechanism comes from ecology, not gardening folklore. A guild is a functional community where plants occupy different ecological niches, not just neighbors that tolerate each other. The nitrogen-fixer doesn’t help the tomato because they’re “friends.” It helps because legumes convert atmospheric nitrogen into plant-available form through a symbiotic relationship with rhizobia bacteria in their root nodules. You place them strategically to create nitrogen availability where it’s needed most.
Most companion planting advice recycles superstition. Basil and tomato together doesn’t magically improve flavor or pest resistance. What matters is that basil occupies vertical space differently than tomato, uses different root depths, and attracts different beneficial insects. The guild works because you’ve engineered resource partitioning. A raised bed guild stacks plants by rooting depth, nutrient demand, and light interception. Shallow-rooted lettuce sits under tall beans. Nitrogen-demanding squash grows near nitrogen-fixing legumes. The frame constrains the system, which forces intentional design instead of random placement.
Building Communities That Compound
The real design principle is staggered demand and supply running on a calendar. You plant your guild in phases, not all at once. Early spring legumes establish nitrogen fixation before heavy feeders arrive. By mid-season, that nitrogen is available when tomatoes and peppers need it most. The guild doesn’t work because plants help each other. The guild works because you’ve sequenced resource availability to match growth curves. Plant a nitrogen-fixer and a heavy feeder together at the same time and one will outcompete the other for existing nitrogen. Stagger them and you’ve created a resource flow.
Start with three tiers: nitrogen-fixing layer (beans, peas), heavy-feeding layer (tomatoes, squash, peppers), and light-feeding layer (lettuce, spinach, herbs). Stack rooting depths so no two plants mine the same soil zone intensely. Deep roots go nine to twelve inches. Medium roots reach five to seven inches. Shallow roots stay at two to four inches. Place plants physically to maximize this separation. Run succession plantings so peak nutrient demand never coincides with zero supply. This sequencing is the actual protocol that sustains yield.
Succession Planting: The Time Space Continuum Of Your Small Garden Bed Layout

Stagger Plantings For Year Round Harvest
You want to believe one planting feeds you all season. It doesn’t. The real mechanism is simple: vegetables mature on a fixed timeline regardless of your wishes, then they’re done. You either harvest them all at once or you plant in waves. Most beginners plant everything on day one and wonder why they have lettuce for two weeks then nothing. Succession planting is just deliberate repetition on intervals matched to a crop’s days to maturity.
Pick your target vegetable and check its maturity date. Lettuce hits harvest in 45 days. Plant on day one, then day 15, then day 30. You get three separate harvests staggered across 75 days instead of one glut. The bed stays productive because you’re treating time as a dimension you can manipulate through spacing your inputs. Simple math solves the perception of scarcity.
Rotate Species Within The Same Season
The common advice says rotate crops year to year to prevent disease buildup. Technically true but incomplete. Within a single growing season, you can stack different plant families in the same square and compress your output. This isn’t about disease prevention, it’s about velocity. When spring lettuce finishes in six weeks, that space sits empty for four months if you wait for fall. Replace it with a summer crop that thrives in heat: beans, basil, or chard.
The constraint is root depth and nutrient timing. Shallow-rooted lettuce takes nitrogen fast. When you pull it, add compost, wait three days, then plant deeper-rooting beans that pull from lower soil layers. You’re not rotating to break pest cycles, you’re rotating to compress multiple harvests into one bed without exhaustion. Map out your three-crop sequence before spring arrives, then execute the switchover the day harvest ends.
The Feedback Loop Method: Adapting Your Raised Bed Vegetable Garden Layout
Reading What Your Plants Actually Tell You
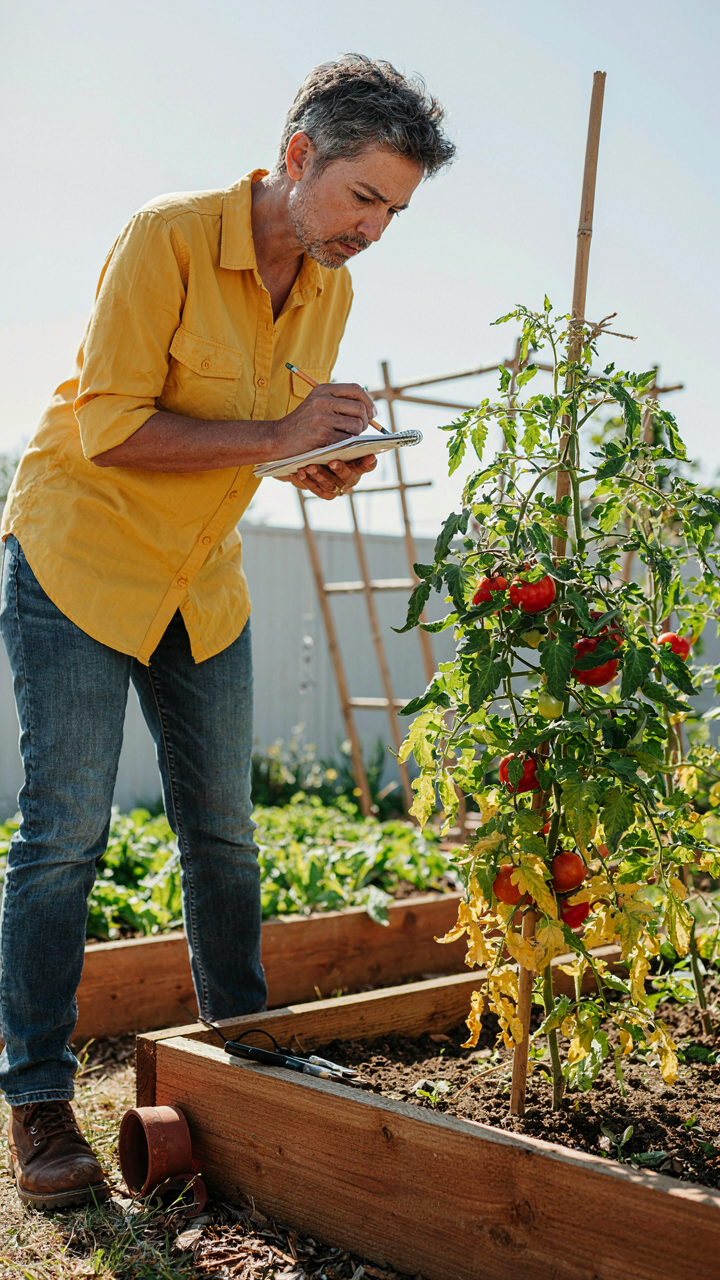
You want to believe your initial plan was perfect. It wasn’t. Most gardeners mistake static layout design for finished work, then ignore the data their plants broadcast weekly. Plant health signals are feedback mechanisms, identical to how biological systems communicate stress. Leaf color, growth speed, pest concentration, and yield patterns reveal whether your spacing, neighbor selections, and sun exposure were right or wrong.
Yellow lower leaves on tomatoes mean nitrogen depletion or poor drainage. Stunted basil near aggressive root competitors means your spacing miscalculation. Powdery mildew clustering on one bed section signals airflow failure in that zone. These aren’t random problems. They’re your layout confessing its flaws. Document what happens. Photograph plants weekly. Note which varieties thrive and which languish in their assigned spots. This data is your only honest feedback about whether your bed design actually works.
Correcting Course Before The Season Dies
Common advice says plan once, execute once, harvest once. This approach wastes an entire season learning what you could have fixed in week four. Real adaptation means moving underperforming plants mid-season, adjusting spacing for next year’s planting, and treating your layout as a living experiment. Tomatoes crowding each other? Prune aggressively or transplant one to a container. Lettuce bolting too fast in direct sun? Relocate seedlings to the bed’s shadowed edge. Squash sprawling into walkways? Trellis it or move it before it tangles everything.
Your second-year layout will be 40 percent better because you actually observed what happened in year one. Make physical changes in season when the problem appears. Don’t wait until harvest review. If a plant performs poorly in June, you still have July and August to test a different position or neighbor pairing. Track what you change and why. That adjustment log becomes your personal raised bed design system, not some generic internet template that doesn’t account for your specific soil, sun angles, and wind patterns.
Edge Effects & Border Benefits: Maximizing Yield In Raised Garden Beds

The Perimeter Problem
You want to believe every square inch of your bed produces equally. It doesn’t. The mechanism is basic thermodynamics: edges lose heat and moisture faster than interior zones, which changes what grows well where. Most beginners waste perimeter real estate on the wrong crops, then blame poor planning instead of bad placement.
Edges receive more air circulation and direct sun exposure on two sides instead of one. This matters. Cool-season crops and herbs tolerate edge conditions better than heat-loving plants. Position your layout by placing temperature-sensitive varieties toward the center and resilient ones at borders. This isn’t optimization—it’s working with physics instead of against it.
- Herbs at borders: Basil, oregano, and thyme thrive on edges where airflow prevents fungal issues and intensity suits their growth pattern.
- Leafy greens along north side: Lettuce, spinach, and kale tolerate partial shade from bed structure and cooler edge microclimates.
- Radishes and quick crops: Fast-growing radishes occupy edge space efficiently since they exit before larger plants need room.
- Root vegetables: Carrots, beets, and turnips handle edge drying better than fruiting crops and don’t compete for interior real estate.
- Trailing plants outward: Allow sprawling herbs like creeping thyme to grow over edges rather than into the bed, doubling usable space.
The perimeter isn’t a second-class zone—it’s a different zone. Treat it as such. Map your bed edges based on what handles exposure, not what you want in the center.
Beneficial Insects Need Architecture
Beneficial insects don’t show up because you want them. They show up because you built a habitat they can use. This is basic ecology: structure precedes population. Most raised beds ignore this and wonder why pest pressure remains high despite crop rotation.
Edges create the architecture insects need. Leave a thin strip of native flowering plants, cover crops, or unmulched soil along one perimeter. Insects need landing zones, water access, and food sources outside the crop itself. A six-inch band of alyssum or borage at a bed edge attracts pollinators and parasitic wasps simultaneously. These aren’t decorative—they’re functional infrastructure. The secondary benefit arrives automatically: predatory insects establish territory and suppress pest populations before infestations develop into problems you can’t ignore.
The Unseen Network: Cultivating Soil Mycology For Optimal Garden Layout Vegetable Performance

How Fungi Move Nutrients Where Plants Need Them
You want this section because you sense that your layout doesn’t matter if the soil underneath doesn’t work. You’re right. Biology, not geometry, determines yield. The mycorrhizal network functions like a supply chain: fungi extend far beyond where plant roots can reach, extract phosphorus and micronutrients from soil particles, and trade them directly to root cells in exchange for sugars. Your layout’s spacing and bed dimensions mean nothing if the soil can’t deliver. Dense fungal colonies amplify nutrient access across the entire raised bed footprint.
Most growers ignore this entirely and just add compost. That’s incomplete. Fungi need stable conditions to colonize: consistent moisture between 60-80% field capacity, organic matter to feed on, and time to establish networks. A raised bed three weeks old has minimal fungal activity. A raised bed maintained for two seasons has established fungi that work continuously without extra input. The difference in vegetable vigor between these scenarios is enormous, and spacing alone won’t close that gap.
Building Active Microbial Colonies In Your Bed
Stop thinking of soil as inert growing medium. It’s a living system with specific requirements. Bacteria and fungi compete for organic matter, suppress pathogens through metabolic byproducts, and aggregate soil particles into stable structure. Beginners add mulch on top of beds and never check what’s happening below. The real mechanism is this: undisturbed soil with consistent moisture develops layered microbial zones. Top layers stay aerobic. Lower layers become anaerobic or facultative. This stratification lets different organisms do different jobs simultaneously.
Build active colonies by adding aged compost or well-rotted manure to your beds in spring, then leaving the soil undisturbed for 4-6 weeks before planting. Avoid digging, tilling, or turning. Water consistently so moisture penetrates 8-12 inches deep. These conditions let bacterial colonies reach stable populations and fungi establish thread networks. Once established, this microbial engine reduces your fertilizer needs and increases vegetable uptake of what nutrients exist. Plant into an active bed, not an empty one.
The Real Obstacle Isn’t Complex Layouts; It’s Your Resistance To Seeing A Garden Not As A Collection Of Plants, But As A Self-optimizing Biological Machine

Most people fail their gardens because they treat each plant like a separate problem to solve. You don’t need a perfect layout. You need to stop thinking like a gardener and start thinking like an engineer. Every plant you place either feeds the system or drains it. Today, sketch your bed on paper and ask one question: which plants make the others stronger? That question changes everything. Your garden doesn’t need perfection. It needs feedback loops.



