

The Unseen Advantages: Why Elevation Trumps Ground Level

Soil Temperature Regulation For Extended Seasons
You want to grow longer because you think it makes you more serious about gardening. The real mechanism is thermal mass and heat retention. Elevated beds warm faster in spring because soil sits exposed to air and sun on all sides, not buried against cold earth. Physics governs this: the ground acts as a heat sink. Raise your soil off it, and you’ve moved your growing environment into a warmer microclimate that responds to daily temperature swings instead of absorbing them.
Soil in elevated beds reaches usable temperatures two to three weeks earlier than ground-level plots. In fall, the same principle works in reverse, but less dramatically—the beds cool faster once air temperature drops. The practical move: build your beds at least 12 inches high to gain meaningful thermal separation. Fill them with dark soil (not light mulch on top) to absorb and retain heat. Water in late afternoon on cool days to capitalize on nighttime retention. This isn’t theory. It’s the difference between harvesting in late March and early April.
Drainage Control: Preventing Waterlogged Roots
Generic advice says “elevated beds drain better.” That’s incomplete. The mechanism is gravitational flow and oxygen availability. Water moves through soil by gravity, not by magic. In ground-level beds, water hits the hard pan beneath and sits there, suffocating roots. Elevated beds terminate at the bottom—water exits immediately instead of pooling. Your roots stay oxygenated because the soil stays aerobic.
Clay soils are where this matters most. A ground-level clay bed becomes a swamp after rain. Raise that same soil 18 inches, and drainage happens fast enough to prevent anaerobic decomposition. The protocol: use landscape fabric on the bottom if you’re on concrete or clay, but only to separate soil from the surface—not to block water. Build to at least 12 inches for sandy soil, 18 for clay. Waterlogged roots kill more crops than poor soil ever will.
The Biomimicry Protocol: Learning From Natural Systems

Forest Stratification: Layering For Diverse Growth
You want this section because you suspect there’s a shortcut buried in nature that everyone else missed. There is. Ecology teaches us about vertical stratification: the principle that forest ecosystems maximize productivity by occupying distinct height zones. In elevated garden beds, stratification means stacking plants by mature height and root depth to eliminate competition and accelerate nutrient cycling. Most gardeners plant flat. They don’t think vertically.
The mechanism is straightforward. Tall plants (tomatoes, pole beans) occupy the upper canopy layer and create partial shade. Medium plants (lettuce, chard) sit beneath, using filtered light and staying cooler. Root systems anchor at different soil depths: shallow feeders at two to four inches, mid-range at six to eight inches, deep roots at twelve-plus inches. This prevents one plant from monopolizing resources another needs. You build structure into the bed itself through intentional spacing and timing.
Mycorrhizal Networks: Fungal Partnerships For Nutrient Exchange
Biology has long understood that fungi form underground trading networks between plant roots. In soil science, this mutualistic relationship moves nutrients plants cannot access alone. Elevated garden beds accelerate mycorrhizal colonization because you control the soil composition from the start. You’re not fighting decades of chemical buildup or pathogenic fungi. You’re building a clean substrate where beneficial networks establish faster.
The protocol requires specific soil architecture, not magical thinking. Mix aged compost (three to five years old, not fresh) with peat or coco coir and add mycorrhizal inoculant before planting. The fungi need organic matter to colonize and a stable pH between 6.0 and 7.0. Avoid fungicides and synthetic fertilizers that kill the network. By season two, established hyphae connect root systems across your bed, allowing nutrient exchange between plants. Test soil biology annually to confirm fungal presence is increasing.
Beyond The Box: Strategic Dimensions For Growth

How Deep Should Your Bed Really Go
You want the perfect depth because you think it signals commitment to serious gardening. But the real mechanism is simple: root systems demand specific volume to access nutrients and water without fighting compacted soil or drainage problems. Most vegetables need 12 to 18 inches minimum. Shallow beds trap heat and dry faster. Deep beds waste money on fill material that roots never reach.
Tomatoes, peppers, and root crops like carrots or beets demand the full 18 inches or more. Leafy greens and herbs work in 10 to 12 inches. Go deeper than 24 inches and you’re paying for soil you won’t use while creating drainage dead zones at the bottom. The limiting factor isn’t ambition, it’s what the plant actually needs to thrive and what your back can handle during construction and maintenance.
Width That Doesn’t Waste Your Time
The economics of elevated beds hinge on access, not aesthetics. A bed wider than 4 feet forces you to lean, stretch, or walk into the middle to reach the center. You’ll skip maintenance. Pests will win. Harvesting becomes friction. Four feet maximum keeps everything within arm’s reach from either side without straining or stepping on soil.
Narrower beds, around 2 to 3 feet, let you plant in denser rows because you access every plant easily. You catch problems faster. You weed and prune without climbing in. The trade-off is you build more linear footage of infrastructure to cover the same square footage. Run the math for your space. A bed that looks proportional might cost you three times the maintenance effort.
Material Science: Durability Vs. Detoxification

Wood That Won’t Poison Your Food
You want reassurance that your setup is safe—that’s the real fear underneath the question. Here’s the mechanism: wood breaks down over time, and certain species leach compounds into soil faster than others. Cedar and redwood contain natural oils that resist rot, which means they also resist leaching those oils into your growing medium. Pressure-treated lumber from before 2004 contained arsenic. Modern pressure-treated wood uses copper compounds instead, which still migrate into soil, especially acidic soil where vegetables grow.
The move is simple: use untreated cedar or redwood if budget allows, or accept that composite materials outlast both and leach less. Cedar lasts 10-15 years before significant breakdown. Redwood performs similarly. If you’re in a climate with wet winters, expect degradation on the bottom boards first. The trade-off is real: natural wood looks better and costs less upfront, but replacement cycles matter when calculating actual cost per season.
Recycled Plastic: The Leaching Question Nobody Answers Honestly
Recycled plastics were never designed for direct soil contact with vegetables. Here’s what actually happens: as UV light and temperature fluctuations stress recycled plastic, the polymers break down and release additives and monomers into surrounding soil. Virgin plastic used for food storage has been vetted for safety. Recycled plastic has not. The material science term is “migration”—think of it as the inverse of absorption. Instead of soil drawing nutrients up, the plastic sheds compounds down.
Recycled plastic raised beds market themselves on sustainability. What they don’t mention is that most were never tested for vegetable safety. Your safest plastic option is virgin high-density polyethylene (HDPE) or food-grade plastic liners inside whatever frame you choose. Composite materials blend wood fibers with virgin plastic and add stabilizers specifically to prevent leaching. They cost more but eliminate the gamble. Check product documentation for third-party testing, not marketing claims.
The Vertical Advantage: Maximizing Real Estate With Trellis Systems
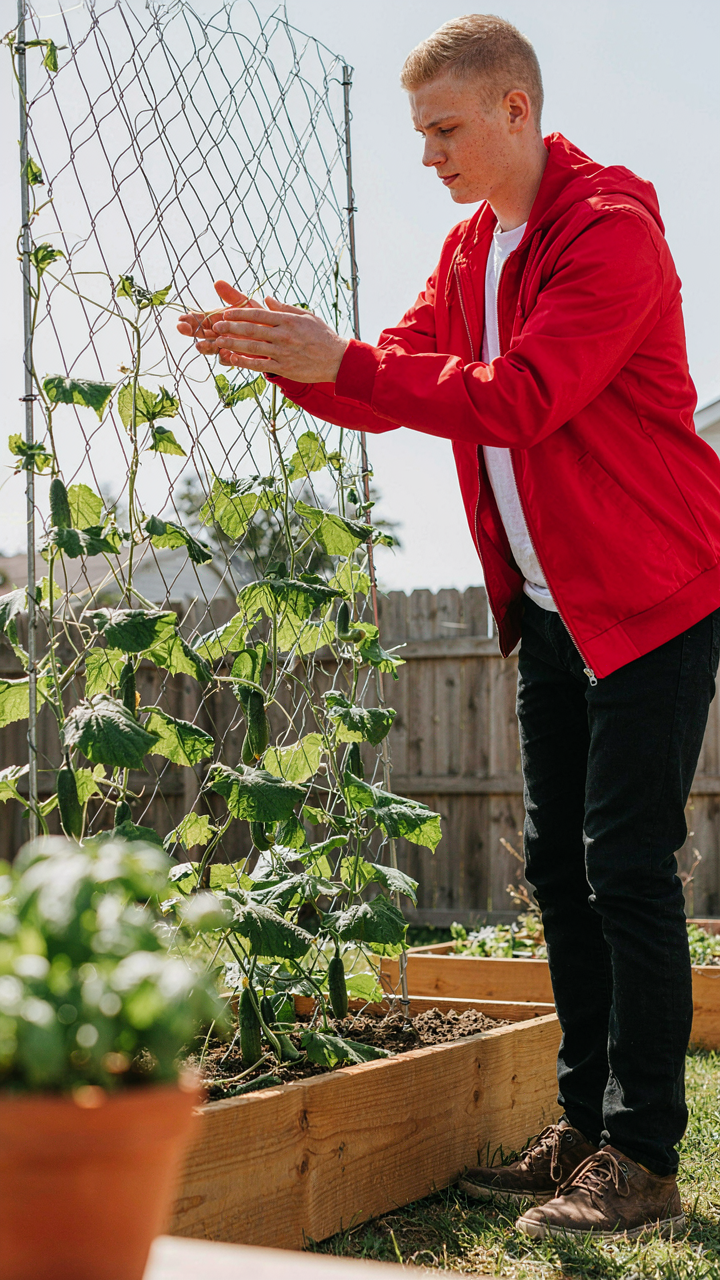
Wire Trellis And Support Structures For Climbing Plants
You want a garden that looks intentional and productive without eating up your whole yard. The mechanism is simple: vertical growth converts wasted airspace into usable growing volume. Wire trellises and panels attached to elevated beds don’t just save ground footprint—they change the microclimate around your plants by improving air circulation and reducing fungal pressure on lower foliage.
Wire trellises work because they’re minimally invasive. Galvanized steel or stainless steel wire resists rust and lasts decades. You anchor them directly to bed frame corners or side boards, creating a grid or lattice pattern. Climbing plants—tomatoes, beans, cucumbers, peas—naturally wrap around the wires as they grow. The key is securing the wire taut enough to support weight without sagging, which means tension matters more than gauge. A single wire frame costs less than a rigid panel but demands correct installation the first time.
Plant Specific Design For Maximum Yield
Horticultural strategy requires mapping plant behavior onto structure, not the reverse. Heavy fruiting tomatoes need stronger support than light pea vines. Determinate varieties sprawl; indeterminate varieties climb vertically for months. Your trellis design must match what the plant actually does, not what marketing copy claims it will do.
- Indeterminate Tomatoes: Require tall trellises (6-8 feet) with continuous tie points every 12 inches as growth accelerates through season.
- Pole Beans: Climb aggressively and need smooth horizontal or angled wires they can wrap around; vertical strings invite tangling.
- Cucumbers and Melons: Heavy fruit demands reinforced wire or cable trellis; lighter varieties tolerate basic panels but still need tie-downs for developing fruit.
- Peas and Hops: Light climbers that prefer fine mesh or thin wires for tendrils to grip; thick wire wastes their wrapping energy.
- Perennial Vining Crops: Kiwi and grape require permanent structures rated for multi-year growth; temporary wire systems fail under accumulated weight.
Trellis integration means choosing materials and geometry before planting. A horizontal A-frame works for beans and peas but fails for tomatoes in wind. A vertical wire grid handles tomatoes but limits airflow for high-humidity areas. Install the structure during bed construction, not after. This eliminates root damage and gives plants established anchor points from day one.
Engineered Substrates: Beyond Topsoil And Compost

The Layering Strategy That Actually Works
You want this section because you suspect dumping generic potting mix into your bed wastes money and delivers mediocre results. You’re right. Think of soil structure through the lens of civil engineering: load-bearing capacity determines what grows above it. Your substrate isn’t just food for plants. It’s infrastructure. The difference between a collapsing bed and a thriving one is deliberate layering that manages water, air, and nutrient distribution over time.
Start from the bottom with coarse material: broken terracotta, wood chips, or gravel in a three to four inch layer. This creates the drainage plane. Above that, add a layer of landscape fabric to prevent soil from filtering down into the void space. Then build your actual growing medium in stages: aged compost mixed with coir or peat moss for water retention, followed by a nutrient-dense layer of finished compost or well-rotted manure, then topsoil on top. Each layer serves a specific function rather than hoping everything blends into something useful.
Biological Activity Through Targeted Amendments
Compost tea sounds like wellness marketing. It isn’t. It’s a delivery mechanism for active microbes that colonize your substrate faster than they would through passive aging. Brew finished compost with dechlorinated water and an aeration source for twenty-four to forty-eight hours, then apply it directly to your bed. The microbes establish quickly, breaking down organic matter and making nutrients available to roots immediately.
Beyond tea, layer in amendments based on what your specific plants demand. Nitrogen-fixing cover crops like clover worked into the top few inches before planting season will reduce your fertilizer load. Mycorrhizal fungi added at planting time create the nutrient uptake network roots can’t build alone. Kelp meal and fish bone meal provide slow-release minerals. Don’t add everything. Test your soil first, identify the actual deficit, then add only what’s missing.
The Self Sustaining Bed: Water Harvesting And Permaculture Principles
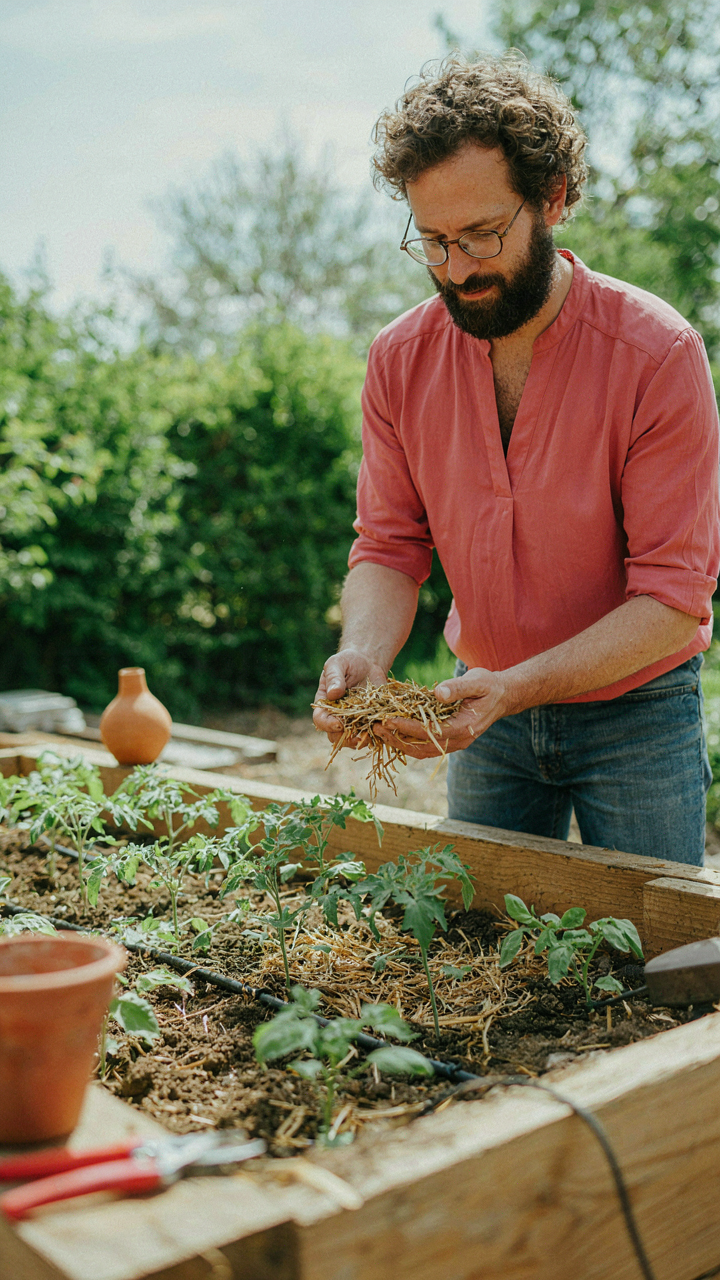
Drip Lines And Ollas For Targeted Water Delivery
You want this section because you’re tired of watering by hand and sick of the waste. Here’s the mechanism: permaculture borrows from systems thinking in ecology, where efficiency means moving inputs through layers. A drip line is that layer for your raised bed. Water reaches roots directly instead of the surface, cutting evaporation loss by 50 percent or more. Ollas—buried clay pots filled with water—work through slow permeation. The soil draws what it needs as it dries. Both methods eliminate the guesswork and the guilt of overwatering.
Drip lines run on gravity or low pressure, so you don’t need complex plumbing. Bury the emitter tubing two to three inches deep along plant rows. Space emitters six to twelve inches apart depending on soil type and plant density. Ollas work best in clay or loamy soil where water moves slowly through capillary action. In sandy beds, water escapes too fast to be useful. The real advantage of ollas is zero maintenance once buried—no filters, no power, no timers to fail.
Heavy Mulch For Moisture Capture And Temperature Stability
Most people mulch because they heard it stops weeds. That’s incomplete. Mulch functions as a moisture storage system and temperature buffer. A three to four inch layer of wood chips or straw creates a microclimate that keeps soil temperature stable and reduces evaporation by 70 percent. The mulch absorbs water during irrigation, holds it near the root zone, and releases it slowly as the bed dries. This is hydrology applied to gardening.
Layer mulch in stages as the season progresses. Apply the initial layer after planting, leaving two inches of space around plant stems to prevent rot. Refresh with one to two inches mid-season as the original layer breaks down and compacts. Use coarser wood chips for perennial beds and finer materials like straw for seasonal crops. The decomposition itself feeds the soil biology that improves water retention over time.
The Builder’s Blueprint: From Raised Garden Bed Plans To DIY Mastery
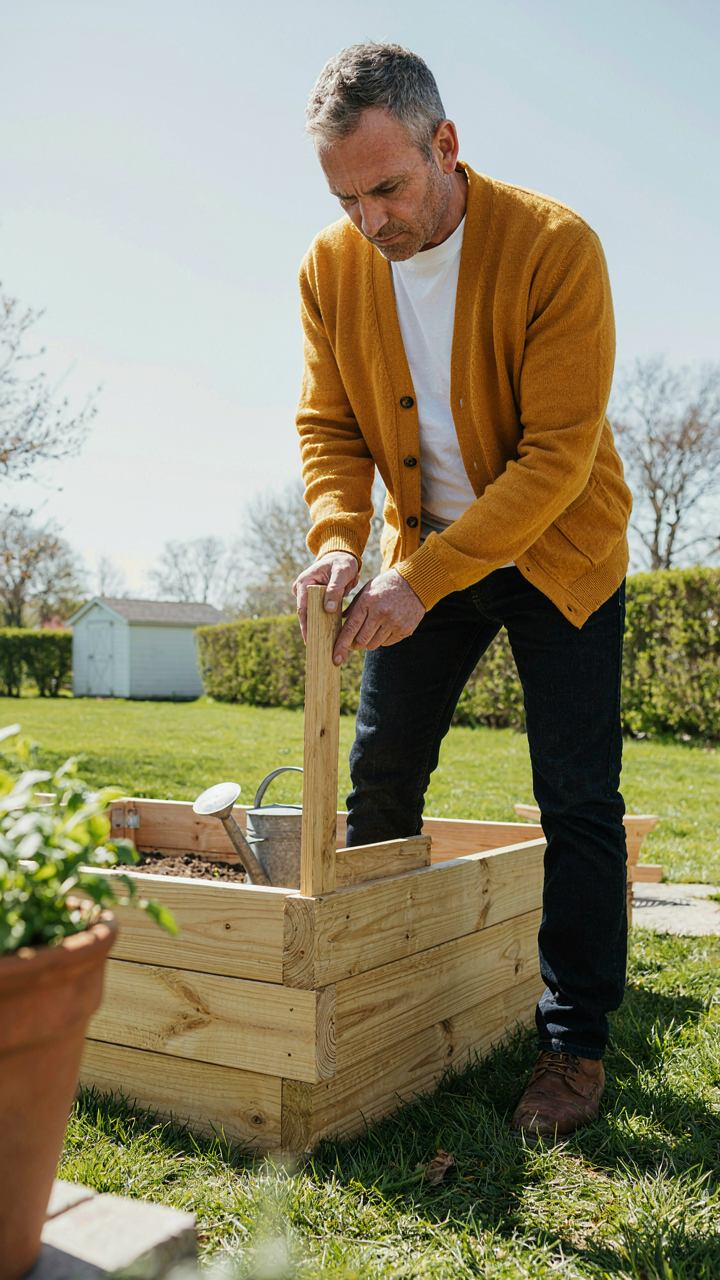
The Cut List That Actually Matters
You want the plans because you think they’ll save you money. They won’t, unless you stop guessing and use them as a load-bearing system for your decisions. Think of woodworking cuts like engineering stress points: each dimension carries weight. A 2×10 board running 8 feet spans differently than a 2×8. The standard depth for vegetable beds is 12 inches minimum because roots need that much soil column before hitting clay or compacted earth. Width matters more than people admit—36 inches lets you reach the center from either side without stepping inside and compacting soil.
The cuts you need depend entirely on your soil type and what you’re growing. Shallow beds work for greens and herbs. Deep beds work for tomatoes, carrots, and root vegetables. Write down your actual dimensions before touching a saw. Measure twice, cut once is cliché because it’s the mechanism that separates wasted materials from functional structures. A 4×8 bed needs corner posts, two long boards, and two short boards—that’s the entire cut list. Don’t overthink it.
Method Over Materials In Assembly
Most assembly advice skips the real problem: people confuse fastening with structural integrity, then their beds fail after one season. Structural integrity comes from how load distributes, not from the fastener count.
- Corner post placement: Posts absorb vertical and lateral stress. Bury them 12 inches deep in soil or concrete. This prevents frost heave and keeps boards from racking sideways during freeze-thaw cycles.
- Board-to-post connection: Use galvanized or stainless steel fasteners, not coated nails. Screws driven perpendicular to the board grain hold better than screws driven parallel. Two fasteners per board end minimum.
- Wood selection for longevity: Cedar, redwood, and composite materials resist rot better than untreated pine. Avoid pressure-treated if growing edibles. Untreated softwood beds last 5-7 years; rot-resistant wood lasts 12-15 years.
- Level verification before soil load: Check all four corners with a level after assembly but before filling. Uneven settling happens fast once soil weight applies. Correct it now or deal with water pooling and root problems later.
- Drainage consideration in design: Beds built directly on clay need gaps between boards and soil contact, or drill weep holes. Standing water kills roots and accelerates wood decay from the inside out.
The assembly sequence matters more than most people think. Build the frame on flat ground, square the corners using the 3-4-5 triangle rule, then move it to its final location. Moving after assembly is easier than fighting a twisted frame for years. Secure everything before you add soil because 800 pounds of wet soil exerts constant outward pressure that poor fasteners can’t handle.
The Minimalist Gardener: Tools And Organization As Force Multipliers

Where Your Tools Live Matters More Than Which Tools You Own
You want to feel like you have your gardening life together without actually spending money on it. Here’s the mechanism: elevated beds expose your workflow. On ground-level gardens, tools scatter. In raised beds, inefficiency compounds because you’re standing at a fixed height doing repetitive work. Borrow from logistics: every tool placement either reduces or extends your reach. A shovel stored ten feet away costs you energy on every dig. A trowel within arm’s reach of your bed costs you nothing.
Organization isn’t about aesthetics or Instagram-ready tool racks. It’s about eliminating micro-decisions that drain focus. When you know exactly where a tool is, you grab it without thinking. Your brain conserves energy for actual gardening. Store your most-used implements (hand trowel, pruners, cultivator) on a wall or hook adjacent to your elevated bed. Store seasonal tools (soil amendments, mulch fork) in a covered bin nearby. This proximity principle applies whether you have one bed or twelve.
The Geometry Of Standing Still
Ergonomics isn’t about comfort. It’s about preserving your ability to work without compensation injury that stops you cold. Think of your body as a lever system, the same principle that governs machines. An elevated bed positioned at waist height shifts your load from your lower back to your core and shoulders, which can sustain repeated work longer. A bed that’s 24 to 30 inches tall allows most adults to work without bending past a neutral spine angle.
The real cost isn’t paid immediately. It’s paid three months in when your knees or lower back tighten and you stop gardening altogether. The height and reach of your elevated bed dictate whether you garden consistently or sporadically. Standard bed dimensions (4 by 8 feet, 24 to 30 inches tall) exist because they’ve survived real use. They balance access to the center without overextending your reach. Build to these specs unless you have a specific physical constraint that requires modification.
Your Real Obstacle Isn’t The Bed; It’s Treating Nature As A Hobby, Not A System To Master

Most people build a raised bed and wait for magic. They don’t. You need a system: soil composition, watering schedules, seasonal rotations, pest management. Pick one variable today—soil pH or drainage—and measure it. Stop guessing. The bed itself doesn’t grow anything. Your commitment to understanding the mechanics does. Master the system, and the garden becomes predictable. Ignore it, and you’re just buying expensive dirt.



