

The Illusion Of Abundance: Why More Garden Lights Dim Your Impact

When Addition Becomes Subtraction
You want more lights because you think coverage equals sophistication. It doesn’t. The mechanism at work is the same one in signal processing: noise drowns out signal. When every surface of your garden gets illuminated equally, nothing stands out. The eye has nowhere to rest, no focal point to anchor attention. Your space feels cluttered instead of intentional. Homeowners pack their gardens with fixtures thinking brightness equals better, then wonder why the result feels chaotic and tired instead of curated.
The math is counterintuitive but proven. A garden lit at uniform 50 lux across all zones reads as flat and undifferentiated. The same garden with strategic 15-lux ambient lighting and concentrated 150-lux accent zones on key features creates depth, hierarchy, and visual interest with fewer total fixtures. You achieve more impact with restraint. The wattage and fixture count matter less than the contrast and placement strategy. This is why luxury gardens often look darker at night, not brighter.
The Real Cost Of Clutter
Every fixture you add increases maintenance, electricity consumption, and visual noise during daylight hours. The common advice says “add more lighting for security and ambiance.” That’s incomplete. More fixtures create more shadows, more glare points, more equipment to troubleshoot, and more reasons for the design to feel amateurish. A garden with 12 poorly-placed lights demands more attention and delivers less beauty than one with 4 strategically-positioned fixtures. The difference isn’t subtle. One reads as expensive and intentional. The other reads as overdone.
The constraint forces the real work: deciding what matters. Which trees deserve uplighting? Which pathways need definition? Which seating areas need task lighting? These decisions require taste and restraint, not budget. Once you limit yourself to the essential fixtures, placement becomes critical. Aim lights at 35-45 degrees for upward grazing on plants and architectural features, keep pathway lights at 2-3 feet height to avoid glare, and position accent lights where they illuminate the subject without spilling into sightlines. Scarcity of fixtures forces precision in placement.
The Architect’s Eye: Sculpting With Light In Your Garden

Where Light Stops, Design Starts
You want people to notice your garden and assume you have taste. The real mechanism is this: human eyes don’t move randomly through space. They follow contrast and light intensity like water follows gravity. Garden light fixtures aren’t decorations. They’re navigation tools that force the viewer’s eye to move along a predetermined path. Landscape architects borrowed this from cinema staging, where key lights, fill lights, and practicals (fixtures visible in frame) guide attention in sequence.
Place your brightest fixture on what matters most: an architectural element, a specimen plant, or a gathering point. Secondary fixtures should be 30 to 50 percent dimmer. This creates a visual hierarchy. The eye lands on the brightest point first, then moves to the next tier of illumination. Without hierarchy, all fixtures compete equally and the garden reads as chaotic noise instead of intentional design.
Darkness Is The Unspoken Texture
Everyone talks about light. Nobody talks about what light erases. Shadows aren’t failures of illumination. They’re contrast agents. A fixture pointed upward into a tree canopy throws the trunk into deep shadow, which makes the lit foliage appear to float. This is drama without melodrama. It’s architectural. The absence of light carries as much weight as its presence.
Position fixtures to create defined shadow zones adjacent to lit zones. A 60-degree angle from ground level casts long, clean shadows on hardscape. A 45-degree angle creates softer transition zones. Test angles at dusk before permanently mounting anything. Shadows shift with fixture height, beam angle, and distance from the object. The protocol: mount, observe for one full evening, adjust, then finalize placement.
The Psychological Leverage Of Strategic Garden Lighting Ideas
How Light Temperature Shapes Mood And Behavior
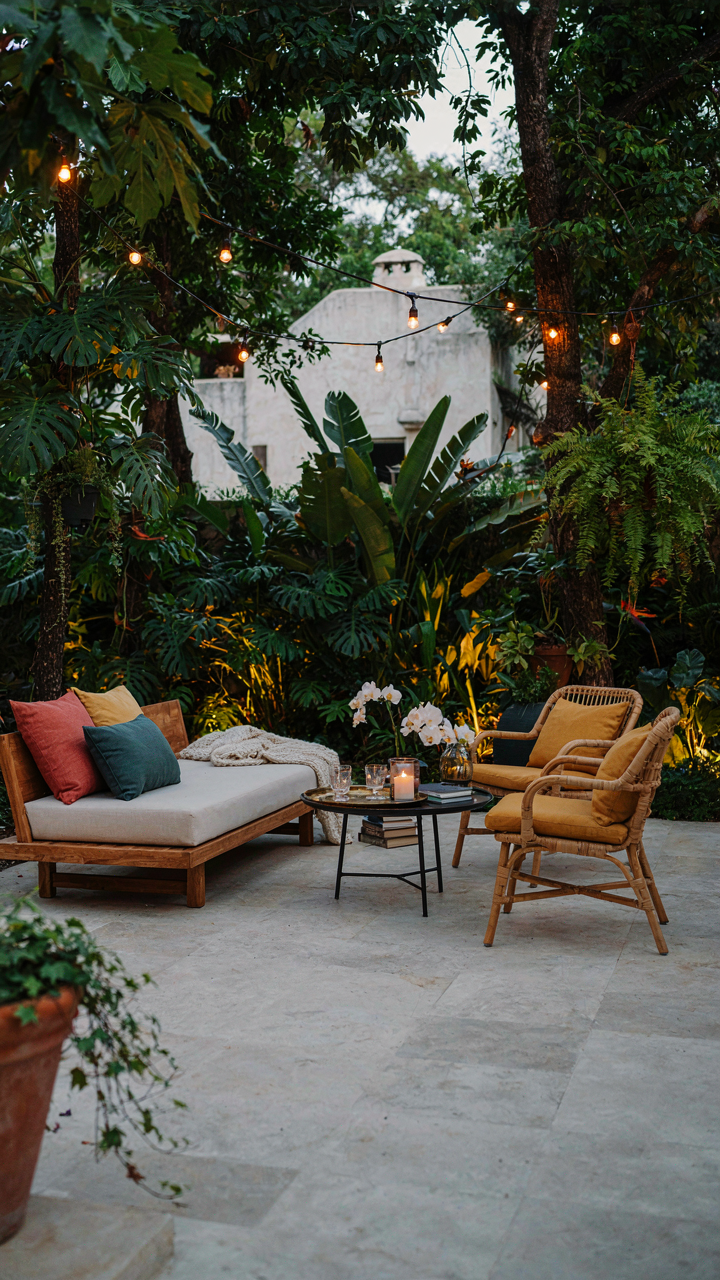
You want people to feel something specific in your garden because that feeling translates to how they perceive your home’s value. Light temperature operates on the same principle as color psychology in marketing: warm light (2700K-3000K) triggers relaxation and safety, while cool light (5000K+) activates alertness. This isn’t subjective. Circadian biology proves humans respond to color temperature as a biological signal, not an aesthetic choice.
Warm light mimics sunset and fire, which your nervous system recognizes as “threat has passed.” Intensity matters equally. Dim warm light creates enclosure and intimacy. Bright warm light feels active and social. Most homeowners get this backwards, blasting cool bright light everywhere and wondering why their garden feels hostile. The mechanism is straightforward: match light temperature to the activity and time of day, then adjust intensity to reinforce the emotional state you’re designing for.
Depth, Distance, And The Illusion Of Space
Strategic lighting doesn’t add square footage, but it manipulates visual perception to make space feel larger or more defined. Backlighting distant trees or shrubs creates layering. Your eye registers light sources at different distances, which your brain interprets as depth. Foreground, middle ground, background. Lighting these separately makes a small garden read as expansive because you’re providing visual information your brain expects from larger spaces.
Concentrated pools of light create focal points that anchor attention, making the surrounding darkness feel intentional rather than empty. Avoid uniform ambient light across the entire garden—this flattens everything into one plane. Instead, use uplighting on vertical elements, downlighting on pathways, and accent lighting on architectural features. This layered approach forces your eye to travel through space rather than stop at a single plane, which is the actual mechanism behind perceived intimacy and scale.
The Minimalist Illumination Protocol For Outdoor Garden Lighting Ideas

Prioritize What Actually Gets Used
You want your garden to look intentional because you’re worried it looks neglected. Here’s the mechanism: most people light everything equally, which makes nothing stand out and wastes power on areas nobody sees at night. Borrowed from landscape architecture’s concept of focal points, you’re establishing visual hierarchy through selective illumination. A focal point in lighting means directing brightness toward one or two features that anchor the entire space.
Start by identifying what you actually use after dark. A seating area. A pathway to the door. A specimen plant or water feature you want to emphasize. Light those three things well. Everything else stays dark or receives minimal ambient glow. This isn’t restraint for aesthetic reasons. It’s restraint because redundant light creates glare, flattens depth, and increases maintenance and replacement cycles on fixtures serving no real function.
Layer Fixtures By Function, Not Just Aesthetics
Conventional advice says to mix uplighting, downlighting, and accent lighting for visual interest. That’s incomplete. The real work is choosing fixtures that pull double duty so you don’t need more hardware than you actually install. A path light with a warm LED pulls a secondary accent function if positioned near a planter. A wall-mounted fixture near seating can provide ambient light and task light simultaneously if the beam angle and wattage are matched to the space.
Material durability determines how long your fixtures stay functional without becoming eyesores. Cast aluminum and stainless steel fixtures handle weather cycles better than painted steel or lower-grade alloys, which corrode and require frequent replacement. Specify fixtures with replaceable LED modules rather than integrated bulbs. This shifts maintenance from replacing the entire unit every five years to swapping a cartridge. The protocol is simple: one fixture per zone, chosen for dual function, built from materials that survive your local climate without cosmetic degradation.
Borrowed Brilliance: Applying Military Camouflage To Front Yard Lighting Ideas

Hide The Source, Not The Effect
You want people to think your yard just looks good naturally, like you didn’t engineer it. That’s the real reason this matters. Military camouflage teaches a hard principle: concealment works by separating the tool from its output. In lighting design, this means the fixture itself disappears while the illuminated space remains visible. The viewer sees the garden, not the equipment creating that vision.
Most outdoor lighting fails because homeowners mount visible fixtures on poles or walls, making the hardware the focal point. The mechanism is simple: when a light source sits in your direct line of sight, your eye locks onto it and loses interest in what surrounds it. Hide the fixture behind plants, below grade, or recessed into structures. The light still reaches its target, but now your attention stays on the garden itself, not the tool doing the work.
Misdirection Through Layered Illumination
Indirect light is the counterintelligence move of garden design. Instead of aiming fixtures at what you want to see, you bounce light off surfaces to create shadow and depth. This technique exploits how human perception actually works: we process shapes and distance through contrast, not raw brightness. When light hits a wall, fence, or hardscape first and reflects into the space, your brain interprets the environment as larger and more complex than it is.
Position uplights at the base of trees to throw light upward through foliage, creating silhouettes and layers. Mount downlights on structures to cast shadows that define space without revealing the source. Place warm-colored fixtures behind planting beds so the plants act as a diffusion screen. The eye follows the reflected light rather than chasing the origin point. This transforms a flat yard into a perceived landscape with genuine depth and intentional zones.
Beyond The Fixture: Integrating Natural Elements With Small Garden Lighting

Water And Mirror Work
You want people to think your garden is bigger and more sophisticated than it is. That’s the real reason you care about reflection. Light physics teaches us about luminous intensity, which is brightness per direction. In garden lighting, reflection doubles your effective intensity without doubling your fixture count. A polished surface behind or beside a light source sends photons back into the space instead of letting them scatter into the void.
Still water acts as a mirror when light hits it at the right angle. Place a fixture near a pond or fountain, and the surface bounces light back across the garden, creating perceived depth and amplifying the glow. Metal fixtures with reflective backs compound this effect. The mechanism is simple: every photon that bounces back into the garden does work twice. Angle matters. A light aimed 45 degrees down into water creates better reflection than direct vertical aim. Test placement before installing permanently.
Texture Mapping Through Light
The mistake most people make is thinking foliage needs bright light to look good at night. Wrong. Plants create visual interest through shadow and contrast, not wattage. Consider how a museum lighting designer treats sculpture. They use light to reveal form, not flood the object. Garden lighting should emphasize the texture you already have.
Beam angle and light position determine what texture shows up. A 60-degree beam from 6 feet away grazes the surface of a textured wall or rough bark, throwing shadows that define structure. A wide 120-degree beam washes the same surface flat. Narrow spotlights work on distant focal points like specimen trees. Wider floods work on nearby walls and planting beds. The protocol: identify which textures you want visible, then choose fixture angle and wattage to create shadow, not illuminate.
The Unseen Advantage: Durability And Smart Placement For Garden Lighting

Materials That Actually Survive Seasons
You want your fixtures to look expensive without replacing them annually. Here’s what nobody tells you: material choice is physics. Aluminum reflects heat and resists oxidation far better than steel because its oxide layer seals itself—unlike steel, which rusts through. This isn’t marketing. Cast brass performs similarly but costs more. The real mechanism is sacrificial corrosion: fixtures fail when the base metal degrades faster than you can maintain them, not when they look weathered.
Most people obsess over finish when they should obsess over base material. A cheap powder coat on steel fails within two seasons in coastal areas or freeze-thaw zones. Anodized aluminum or marine-grade brass doesn’t fail this way because the material itself resists degradation. Choose fixtures rated for your climate zone, not your aesthetic preference. This determines replacement frequency.
Accessibility Shapes Installation Strategy
Maintenance access determines whether your lighting system becomes neglected or reliable. Think like a supply chain manager: if your fixture requires specialized tools to access the bulb or clean debris, replacement happens later than it should. Simple push-click designs outlast threaded enclosures because humans default to lazy. Your fixture placement strategy should assume you’ll avoid crawling into tight spaces.
Position fixtures where you can reach them from ground level or a single-step ladder. Run wiring through conduit at edges of pathways, not buried where landscaping changes destroy it. Group similar fixtures in accessible zones so you service multiple lights in one trip rather than scattering maintenance tasks across your yard. This protocol compresses maintenance time enough that it actually happens.
Escaping The Commodity Trap: True Value In Garden Light Investment

The Real Price Of Cheap Fixtures
You want to feel smart about saving money. Here’s what actually happens: most people confuse low purchase price with low total cost. Economics calls this the sunk cost fallacy, but in garden lighting it works like this: a cheap fixture fails in two seasons, you replace it, and you’ve now spent twice the money plus your time installing it twice. The mechanism is simple. Cheap materials corrode faster in outdoor conditions. Cheap optics scatter light inefficiently. You end up buying more fixtures to get the same effect.
- Corrosion Timeline In Fixtures: Uncoated aluminum and untreated steel begin oxidizing within 6-12 months in wet climates. Powder-coated or stainless steel fixtures resist this 3-5 times longer, directly extending useful life before replacement.
- Optical Efficiency Loss: Budget fixtures use thin plastic lenses that yellow and cloud within 18-24 months. Borosilicate glass holds clarity for 7-10 years, meaning you need fewer fixtures to maintain the same light output over time.
- Installation Labor Compounding: Each fixture you replace costs 30-45 minutes of your time or contractor rates. Installing twice means doubling labor costs, which often exceeds the original price difference between quality tiers.
- Replacement Parts Availability: Premium fixture brands stock replacement lenses, gaskets, and bulb adapters for 10-15 years. Discount brands discontinue parts within 3-4 years, forcing full fixture replacement instead of repair.
- Seasonal Failure Clustering: Cheap fixtures often fail in groups during peak seasons like spring entertaining or holiday displays. You lose functionality when you need it most, not during off-seasons.
A $300 fixture lasting eight years costs $37.50 per year. A $80 fixture lasting two years costs $40 per year before accounting for labor and inconvenience. The math doesn’t lie, but people don’t do it.
Lighting Design That Compounds
Strategic garden lighting compounds because each fixture builds on the previous one’s purpose. You’re not just illuminating a path; you’re creating visual hierarchy, extending usable space into evening hours, and increasing property value. A home with layered garden lighting sells faster and commands 5-8% premiums in most markets. The compound effect happens when you install lights with intention from the start rather than patching coverage later.
Design-first lighting requires one planning session upfront. You map accent lights, pathway lighting, and ambient zones before buying anything. This prevents overbuying fixtures that create glare or waste energy. It also lets you choose fixtures with purpose instead of grabbing whatever’s on sale. The long-term benefit isn’t just aesthetics. It’s reduced electrical draw, lower replacement frequency because each fixture does meaningful work, and a garden that functions better as you use it more. Start with a lighting audit: walk your garden at dusk, identify where you move, where you look, where shadows create dead zones. Install fixtures to solve those specific problems, not to fill empty spaces.
Your Garden’s True Obstacle Isn’t A Lack Of Light, But A Lack Of Intention

Most people buy garden light fixtures and install them wherever feels convenient. Wrong move. Your garden lights only matter if they serve a specific purpose: drawing eyes to what you actually built, creating a mood you control, or solving a real problem after dark. Pick one. Today, walk your garden at dusk and identify a single spot where light transforms the space instead of just illuminates it. Install there first. Everything else follows intention, not inventory.



