Introduction
Welcome to the Forest Treasure Nature Crafts Inspiration Guide. This guide explores creative ways to use simple materials found in nature, such as leaves, pinecones, and stones. If you enjoy hands-on activities and want to connect with the outdoors, nature crafts offer a fun and meaningful way to do that. You will find clear ideas and instructions that anyone can follow, no matter your skill level.
We will look at the best tools and materials for nature crafts, easy project ideas, and tips for making your crafts look great. You can create beautiful art, gifts, and decorations using things you find on your nature walks. Imagine making a pinecone bird feeder or a leaf collage. Let this guide inspire you to explore your creativity while enjoying the forest’s treasures.
Gathering Forest Treasures for Crafting
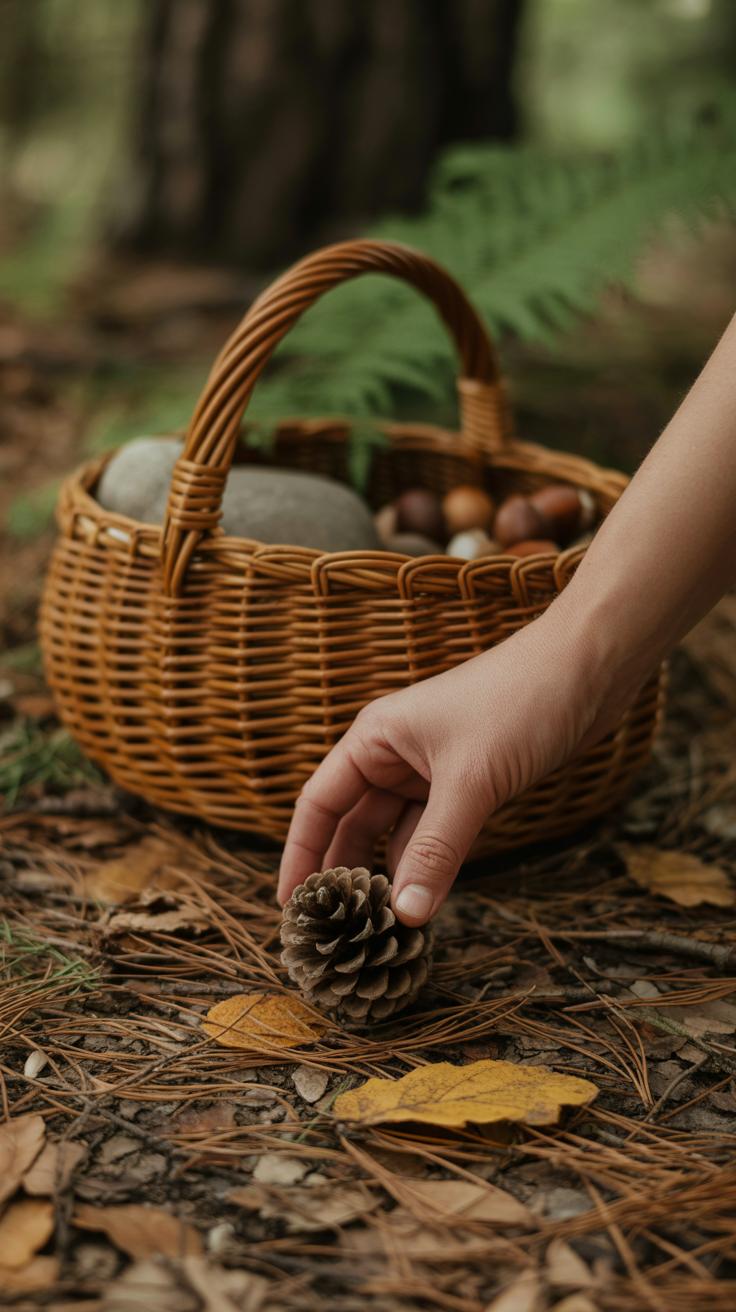
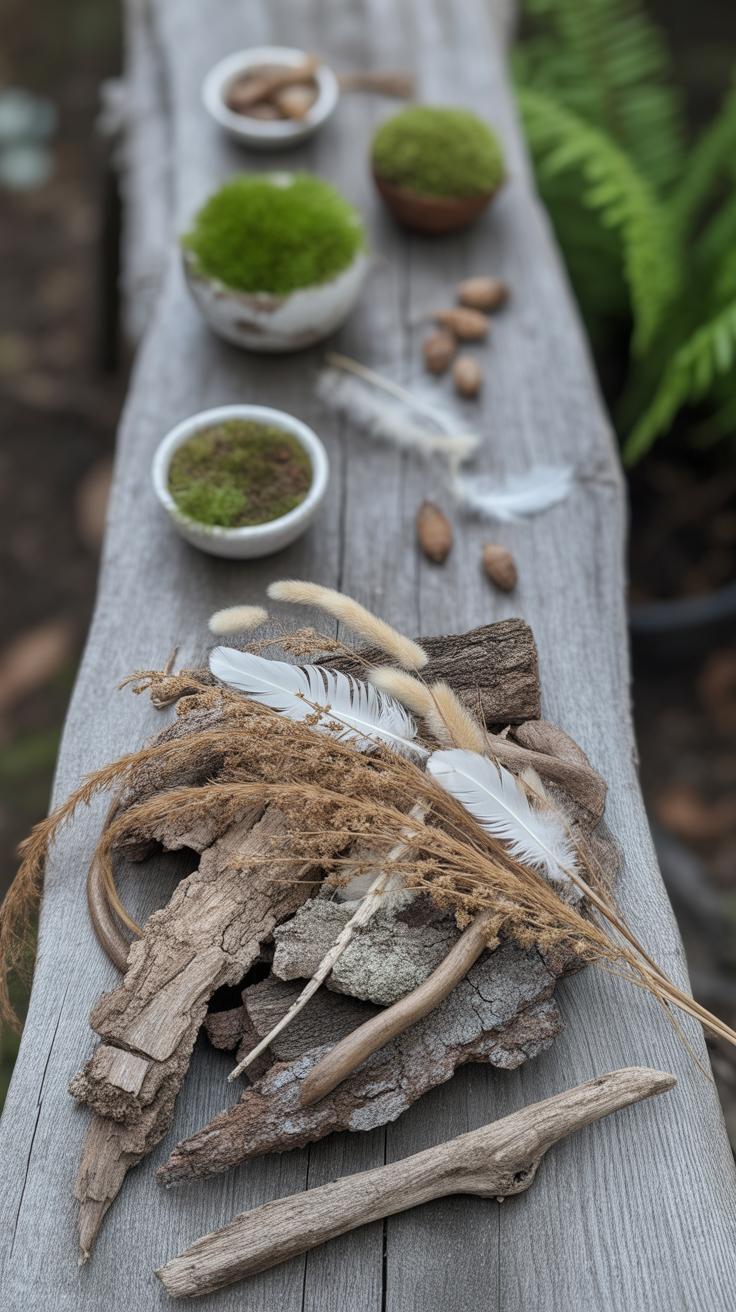
When you start looking for natural materials, the forest is a treasure trove if you know where to look. Fallen branches, pinecones under the trees, smooth stones by a stream—these are usually easy to find without disturbing living plants. Leaves caught on the ground after a breeze, or flowers that have naturally dropped, are great picks too. It feels a bit like a quiet scavenger hunt, but… you want to be careful not to damage anything alive.
Try to take only what’s already fallen. If you see a pinecone lying on the soil, that’s fair game. But pulling leaves from a tree? That’s trickier and can hurt the plant. Look for twigs that are dry and loose rather than snapping branches still attached. It’s a bit of trial and error to know what’s okay to take, and sometimes you might hesitate—should I really pick that flower or leave it for pollinators?
Just be mindful and patient. Sometimes the best discoveries come from slow, careful observation rather than rushing to grab everything at once.
Best Natural Materials for Crafts
Some materials keep showing up as favorites because they’re easy to find and work with. Here’s a quick rundown:
- Leaves: Varied shapes and colors, flexible when fresh but brittle when dry. Good for pressing or gluing.
- Pinecones: Naturally textured, slightly rough, perfect for painting or as bases for miniature figures.
- Twigs: Straight or curved, sturdy but lightweight. You can break them down or use them whole for frames or accents.
- Stones: Smooth or jagged, often with interesting colors or patterns. Great for stacking, decorating, or painting.
- Flowers: Their delicate beauty adds color and softness, especially when dried. Just watch for the species, some might be rare.
These materials all have subtle differences in texture and durability, which can shape what crafts you try. Personally, I find collecting twigs feels grounding—it’s like gathering tiny pieces of the forest’s skeleton.
Tips for Collecting Nature Items
Picking up natural items can seem straightforward, but a few habits make the process smoother and kinder to nature:
- Check local regulations. Some areas restrict collecting plants or natural objects, so a quick look before you start saves a lot of hassle.
- Take only what you can use. Overcollecting feels wasteful, and you might end up with stuff you never craft.
- Store your finds in a breathable bag or basket. Plastic can trap moisture and cause mold, so cloth bags work better.
- Clean items gently before use. Leaves and pinecones often have dirt or small bugs hiding—give them a gentle rinse or air dry.
- Dry flowers or leaves flat between paper to avoid curling if you want to preserve their shape.

One time I stuffed a bunch of leaves in a plastic bag. Days later, they were slimy messes. Lesson learned. It’s little things like these that make collecting nature materials a bit of an experiment—sometimes you get it right, and other times, well, you just learn for next time.
Basic Tools for Nature Crafting
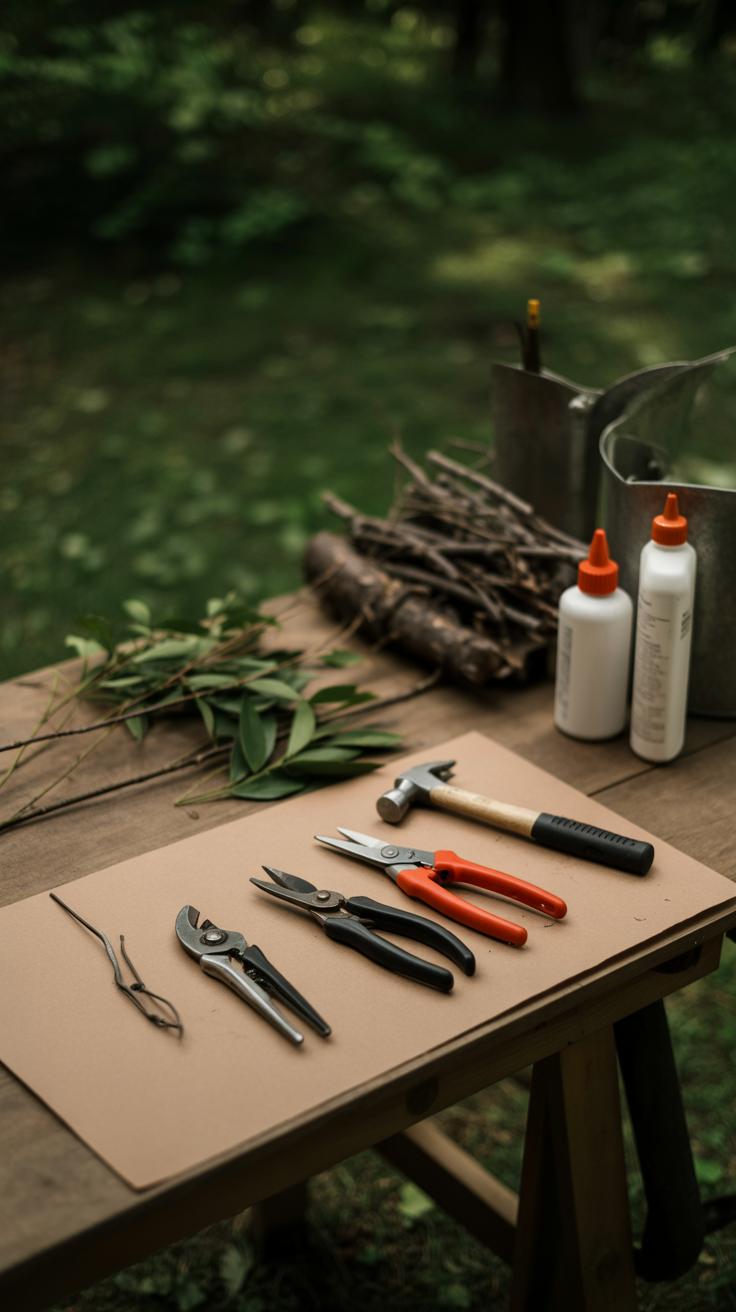
When it comes to crafting with natural materials, you really don’t need a fancy workshop. Just a few simple tools can open up a world of creativity. Think about basic items like glue, scissors, string, and paint. These are versatile and usually easy to find around the house or craft store. For example, a bottle of white glue or a glue stick works well with most leaves, twigs, or pinecones. If you want something a bit stronger, a hot glue gun might come in handy—but that’s better saved for adults or older kids with supervision.
Scissors should be sharp enough to cut through thin branches or string but not too intimidating for little hands. Safety scissors are often the best bet for children—plus, they have rounded tips, which makes a big difference. String, twine, or yarn are easy to use and perfect for tying items together or hanging decorations. As for paint, water-based options like tempera or acrylics are simple and wash off from skin and clothes if you act quickly.
Safety and Ease of Use
Using tools safely cannot be overlooked, especially when kids are involved. Before letting children handle scissors or glue, explain what each tool does and watch them carefully at first. Child-friendly scissors, non-toxic glue, and washable paints reduce the risk and mess. Sometimes, gloves might be a good idea if you’re handling sticky or sharp materials, but that can also take away the tactile feeling kids love.
Keep sharp tools out of reach when not in use. You might want to have a designated “tool time” where children learn how to handle things properly. Don’t expect everyone to master this immediately. Mistakes happen, and that’s part of learning. Maybe at first, you’ll need to do the trickier cuts yourself, which is perfectly fine.
Organizing Your Craft Space
Having an organized space makes crafting feel less like chaos and more inviting. Try using small containers or jars to sort your tools and natural findings. Label them if you like—sometimes, just the act of organizing helps kids get excited about crafting. A big tray or plastic mat can hold bits like leaves and seeds without letting them scatter everywhere. It also makes cleanup easier, which you’ll appreciate.
Consider a shelf or box just for your crafting supplies. If everything has a place, you’re less likely to lose something important—like a glue stick at a critical moment. Plus, when materials are easy to reach, the whole process flows smoother. You might find yourself—or your kids—diving into projects more often because it just feels simpler to get started.
Simple Leaf Art Projects
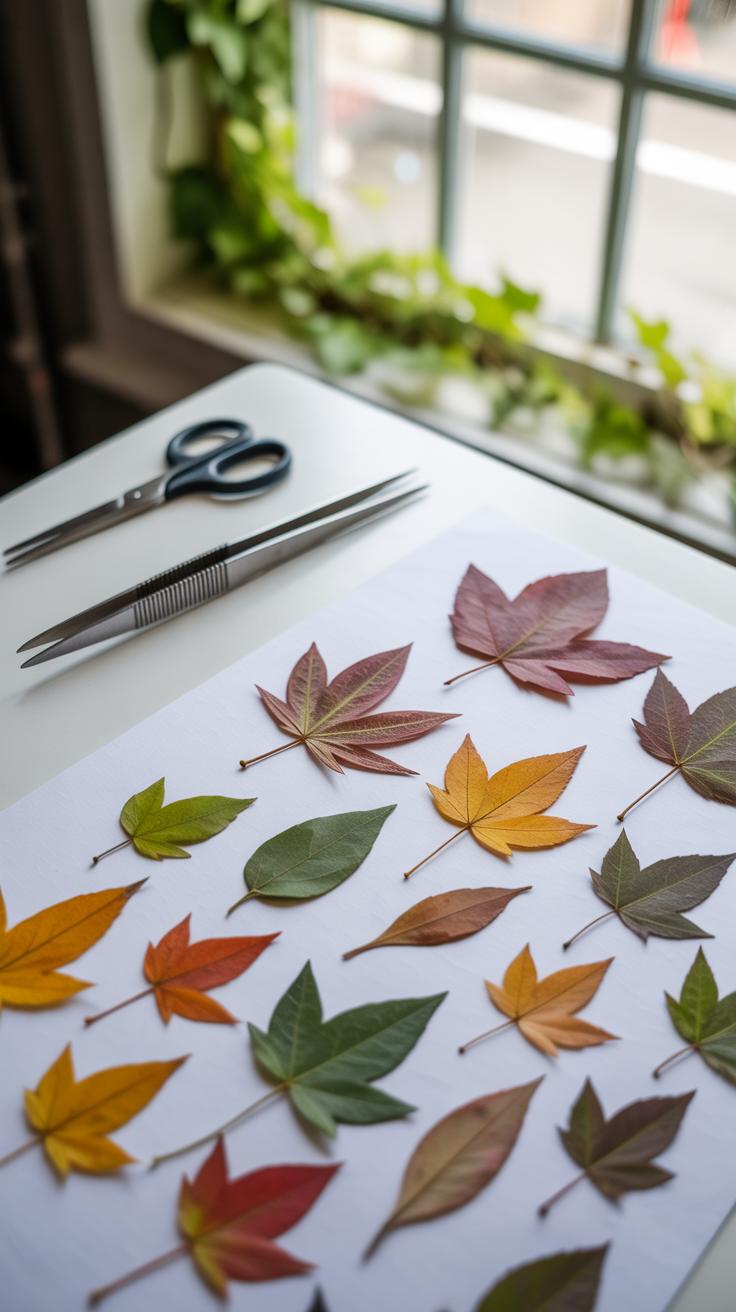
Leaves offer a surprisingly rich world for crafting. You might think, “It’s just a leaf,” but the variety in shape, size, and texture opens up several creative paths. Let’s explore a few projects—leaf rubbings, collages, and stamping—that you can try with just basic materials.
Creating Leaf Rubbings
Leaf rubbings are pretty straightforward but can yield detailed, almost scientific results if you pay attention. Start by placing a leaf vein-side up on a flat surface. Lay a sheet of thin paper on top. Using the side of a crayon (peeling off the paper wrapper helps), gently rub over the leaf’s outline and veins until these details appear clearly. You can experiment with pressure—too hard and you lose texture, too light and the image fades.
Try mixing leaf types to see which capture the best patterns. Birch and maple leaves, for example, usually show veins well, while others might surprise you with subtle textures. Don’t hesitate to try colored crayons for a bright effect.
Making a Leaf Collage
Collages let you play with colors, shapes, and patterns. Gather leaves of different colors and sizes. On a sturdy piece of paper or cardboard, arrange the leaves without glue first. Think about balance and visual flow, but don’t overthink it—you might be surprised by what random layouts can produce.
Once happy, glue the leaves down carefully, pressing so edges stick well. Layering leaves on top of each other creates texture and depth, but watch for thick piles that could be tricky to handle. You might shape your collage into something—like a tree silhouette or an abstract pattern—or just let it stay freeform.
Both rubbings and collages offer simple ways to deepen your connection with nature’s small wonders. Which leaf will you pick first?
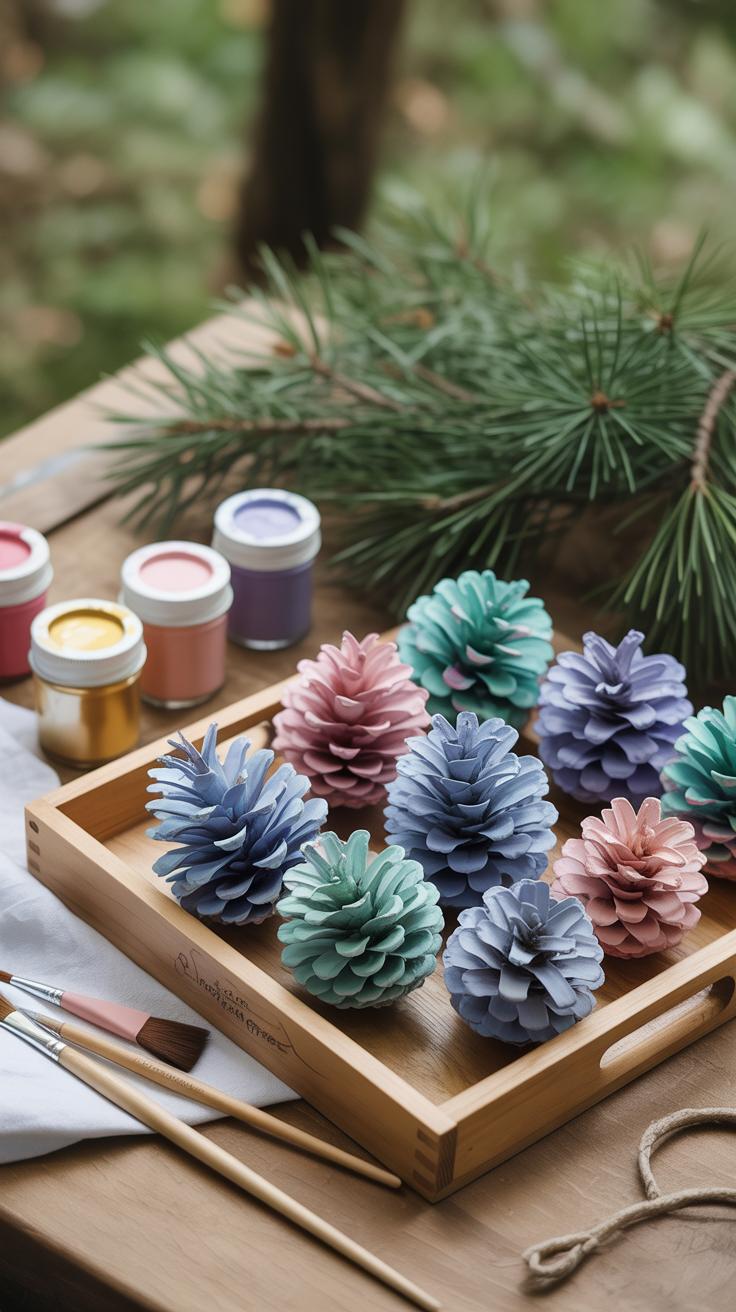
Fun Pinecone Craft Ideas
Pinecones offer a natural, textured base for all kinds of crafts that feel close to the outdoors. You might think they’re just ordinary bits fallen from trees, but they can turn into charming decorations or useful items around your home. For example, making a bird feeder out of a pinecone is surprisingly easy and satisfying.
Building a Pinecone Bird Feeder
Start by finding a clean pinecone—one without bugs or dirt stuck in it. Then, spread peanut butter all over the scales, making sure to get into the crevices. After that, roll or sprinkle the pinecone with birdseed until it clings well to the peanut butter. Tie a piece of string through the top, so you can hang it from a tree branch.
Choose a spot outside where you can easily watch the birds come to snack. Near a window makes sense if you enjoy a close-up view. Expect different birds to show up; this could turn into a little nature show. Just a heads up—you might want to refresh your feeder every few days, especially if the weather turns damp or warm.
Decorating Pinecones
Painting pinecones is a simple way to bring color and personality to your craft. Use acrylic paints to add bold strokes or subtle touches—whatever you prefer. White paint can mimic snow, perfect for winter decorations. Glitter is another option if you want a bit of sparkle, but be careful not to overload; a light dusting often looks best.
You can also glue small beads or tiny natural elements like dried flowers to give a twist on a pinecone’s usual look. These crafts can feel a little messy but having a dedicated space usually helps. One time, I ended up with paint splattered all over my tablecloth—oops—but it was part of the fun. Why not try combining painting with some natural color choices to keep a balance?
Creating Nature Jewelry and Accessories

Making jewelry from natural materials like seeds, stones, and twigs feels oddly satisfying. It’s not just about crafting something wearable but connecting with the textures and forms of nature itself. For bracelets, try stringing together dried seeds and small, smooth stones on a sturdy thread or thin cord. I find waxed linen thread works well—you don’t have to worry much about fraying. Start by knotting one end securely so your beads don’t slip off. Then, experiment with patterns: alternating round stones with flat seeds can give a nice rhythm to the design, or group several seeds of the same type together for a chunkier effect. Sometimes, irregular shapes make a bracelet that looks more interesting—there’s no rule that things must be perfectly symmetrical here.
Twigs make surprisingly good necklace pendants, especially when you find ones that’re slender and straight. You can use natural string or even thin leather strips to loop around the twig. Often, I just tie a loop around a twig and let a simple knot do the work—it doesn’t have to be complicated. If you want to get a little fancier, try gluing small leaves or seeds onto the twig before finishing the necklace. It’s also fun to see how different lengths and widths completely change the look. One time, I made a necklace with a twisted branch, and it ended up looking more like abstract art than jewelry. What kind of twig do you think would suit your style?
Nature doesn’t always hand us perfect pieces, but there’s plenty of charm in imperfection when you create accessories this way. Don’t hesitate to try different combinations or even mix in tiny feathers or flower petals for variety. After all, the best part might be just the act of gathering, assembling, and wearing a bit of the outdoors with you.
Using Flowers and Petals in Crafts
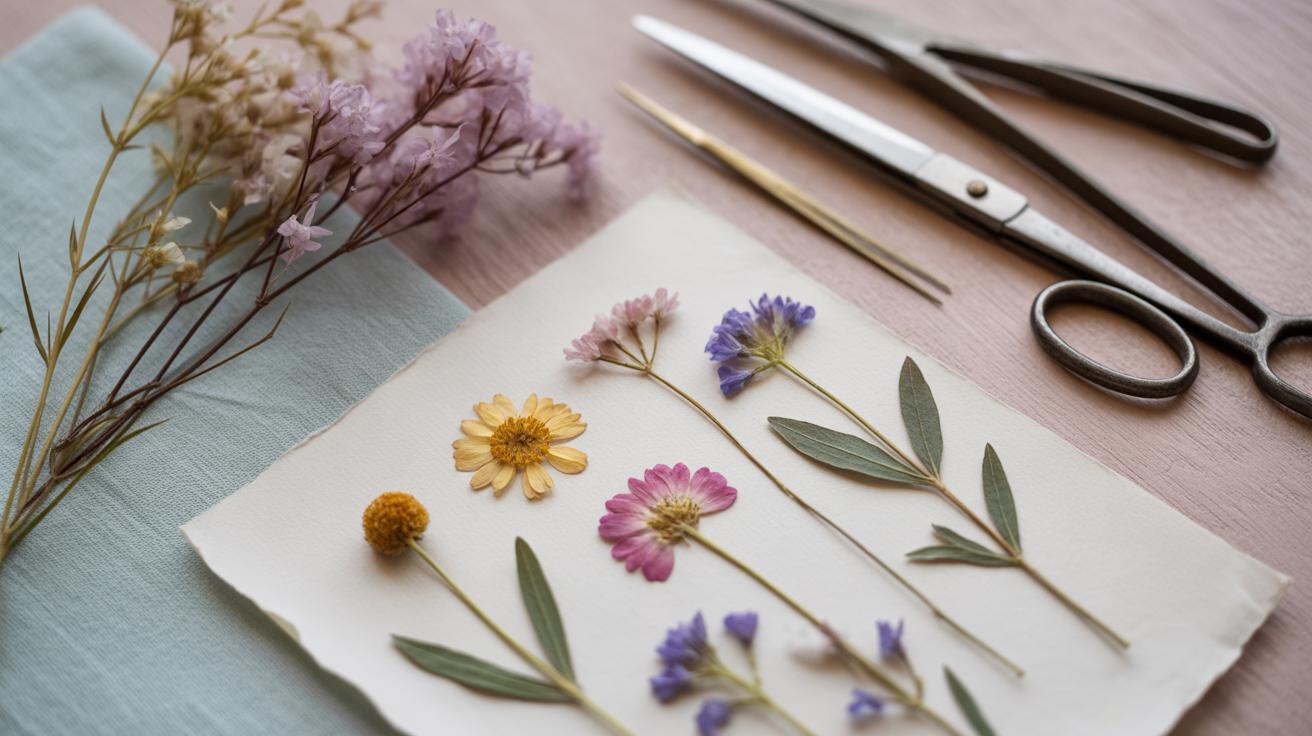
Fresh or dried flowers add a unique touch to your crafts, bringing a bit of nature’s beauty indoors. Pressed flower art is a classic way to use petals, but there’s a surprising variety of ideas you might not have tried yet.
For example, you can decorate greeting cards or picture frames with pressed flowers. It’s a simple process: collect petals or small blooms, press them flat, and then glue them carefully onto your chosen surface. The results feel delicate but personal, and I find it relaxing to arrange these tiny natural pieces just so.
Floral bookmarks make great gifts and are easy to make. You just sandwich dried petals between sheets of clear plastic or laminate paper. It seals the flowers safely and makes a practical keepsake. Sometimes, you might notice that some petals fade or curl slightly, which can add character—though that depends on your preference.
Pressing flowers yourself isn’t too complicated, either. You can use heavy books or even a flower press if you have one. The key is to keep the flowers dry and check them periodically. Too much moisture can cause mold, which, well, nobody wants.
Once pressed, flowers become surprisingly versatile craft materials. You’ve probably seen pressed flower art framed and hanging in homes. It feels like a quiet reminder of the outdoors, even when inside. Have you tried crafting with pressed flowers before? What surprised you most about working with such fragile materials?
Crafting with Stones and Pebbles
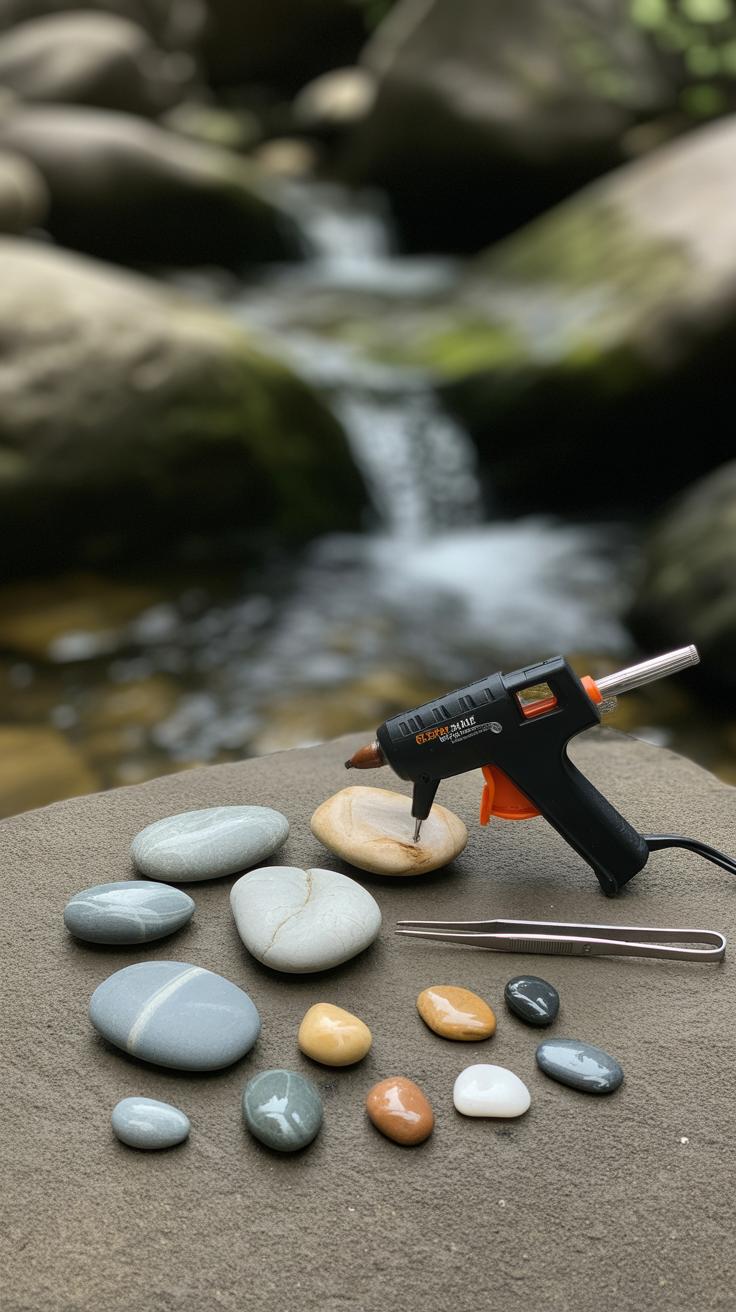
Using stones and pebbles in crafts offers a quiet kind of creativity—one that feels grounded, literally and figuratively. Painting on pebbles makes a small, calming project that you can pick up and put down easily. You might try drawing simple animals like ladybugs or turtles, which only need a few dots and lines to come alive. Or go for patterns: dots, stripes, zigzags, anything that feels right in the moment.
For painting, consider these steps:
- Wash and dry your stones thoroughly to help the paint stick.
- Use acrylic paints—these work well, but if you only have markers, that’s okay too.
- Start with a base color, then add your design once it’s dry.
- Seal your finished pebble with a clear varnish if you want it to last outside.
Arranging stones opens up other possibilities. You can create stone mandalas, arranging pebbles in circular, repeating patterns that can be as simple or complex as you like. Maybe you place your creations along a garden path as markers, writing single letters or symbols on each pebble to spell out a word or mark a plant.
Small sculptures can be made by balancing stones of different sizes. It takes patience, but what results can be unexpectedly charming. Ever tried stacking stones on a beach or riverbank? It feels meditative, though frustrating at times.
Have you ever thought about making your own garden markers by painting the name of herbs or flowers on flat stones? It’s useful and personal, though not too fancy—sometimes that’s just what you need.
Combining Natural Materials for Unique Crafts
Mixing leaves, stones, twigs, and other natural treasures offers a fresh way to bring variety and texture into your projects. You might start with a simple idea—like gluing colorful autumn leaves onto a flat stone—but then wonder what happens if you add tiny twigs around the edges for a frame. The result feels a bit more alive, more three-dimensional.
Try this: collect smooth pebbles, dried seed pods, and some flexible twigs. Bind the twigs into a simple shape, like a star or circle, and fill the center with arranged pebbles and pods. You’ll end up with a piece that invites touch and invites curiosity. It’s not just one material but the interaction between them that makes it interesting.
Nature Mobiles
Hanging mobiles are a fun way to display a mix of natural bits. Gather pine cones, feathers, small branches, acorns, and leaves. Tie each item individually with twine or thread. Arrange them on a sturdy string or a bent branch, spacing items at different lengths. That way, they’ll sway and catch the light differently as they move.
One time, I tried making a mobile using driftwood and beach finds—bits of seaweed that dried stiff, shells, and smooth stones. It didn’t look perfect or balanced, but it had character, almost like a floating forest floor. That unpredictable aspect makes mobiles so engaging.
Seasonal Decorations
Seasonal undertones can shine through when you pair materials thoughtfully. For fall, combine bright leaves and acorns with rough bark strips to create a rustic wreath. In winter, try pine needles, holly berries, and frosted twigs arranged into a table centerpiece. Spring opens doors to floral vines, soft moss, and newly budding branches for fresh garlands.
You might find that borrowing elements from one season for another adds an unexpected twist. A bit of frost-colored lichen in autumn might feel strange but somehow intriguing. Mixing textures, colors, and forms lets you build decorations that feel natural yet unique, perfect for reflecting the mood of your space or time of year.
Sharing and Displaying Your Nature Crafts
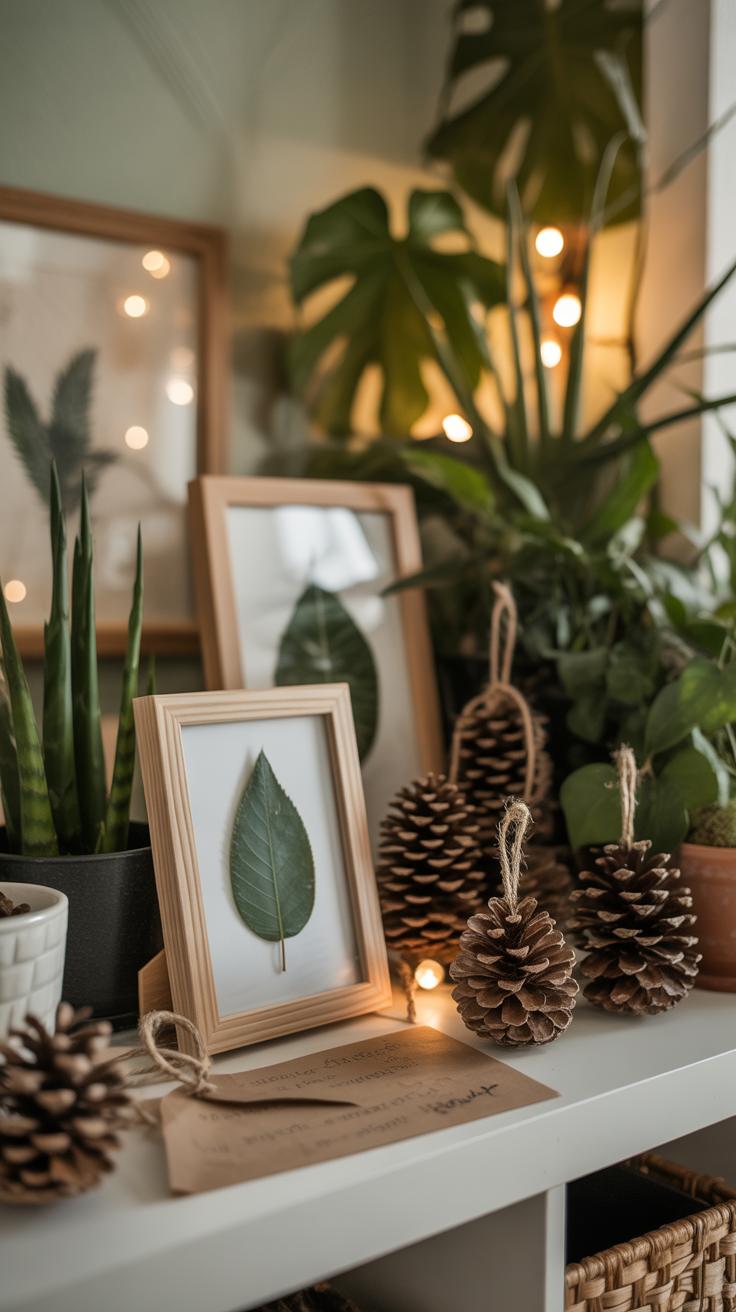
Once you’ve made your nature crafts, it’s tempting to tuck them away, but showing them off can be just as rewarding. You might find that how you display your pieces changes how you feel about them. Think about arranging your crafts where you can see them often—maybe on a shelf by a window or a simple wooden board mounted on the wall. Outdoors can work too, but remember that some materials like leaves or paper won’t last long outside. Try sealing delicate items with a clear spray or framing flat crafts behind glass to protect them.
For indoor displays, grouping similar pieces helps create a small, themed collection. Try mixing sizes and textures; placing rough pinecones near smooth stones, for example, adds a nice contrast. Arranging items on natural wood or stone bases also keeps things feeling grounded, tying the craft back to its origins. Let your collection grow over time rather than setting everything up at once—it makes the display more personal.
Gifting nature crafts adds a personal touch that many store-bought gifts can’t match. Think about tying your gift with a strip of fabric, twine, or even a sprig of fresh herbs or flowers. Wrapping doesn’t have to be perfect; sometimes a bit of rustic charm—like a recycled paper bag or leaf-covered box—says more than fancy wrapping paper. When you gift, you’re sharing not only the craft but also a moment, a place, or a memory tied to those materials.
Don’t forget to photograph your work. Photos let you keep a record without clutter, and they make neat additions to albums. Creating a nature craft album might sound old-fashioned, but flipping through it can be inspiring. You’ll see your progress, remember the walks that supplied materials, and maybe even spot patterns or ideas for future projects. What moments or places would you want to capture alongside your crafts?
Conclusions
You have learned how to find and use natural materials to create beautiful and simple crafts. Nature crafting connects you with the environment and lets your imagination flow. Using easy tools and clear steps, you can turn leaves, sticks, pinecones, and stones into art and gifts. There is a project idea for every skill level, and you can always customize your creations.
Try new projects and enjoy the process of making art that comes from nature’s gifts. Your crafts can brighten your home or be thoughtful presents. The more you practice, the more creative and skilled you become in nature crafts. Keep exploring and let the forest treasures inspire you to make something wonderful every day.


